Search This Blog

Saturday, February 19, 2011

Grasshopper Pie

I made this traditional 1960's pie this past week mostly as a joke. I didn't think I would enjoy eating it, but thought it might get some laughs. It did get laughs and those that tasted it seemed to enjoy it- although I will say it was not my favorite dessert... by any means. What was better (in my opinion) was the ice cream pie that I made that same day. Because what's better than 1 pie? 2 pies. Stay tuned for that recipe.

Ingredients
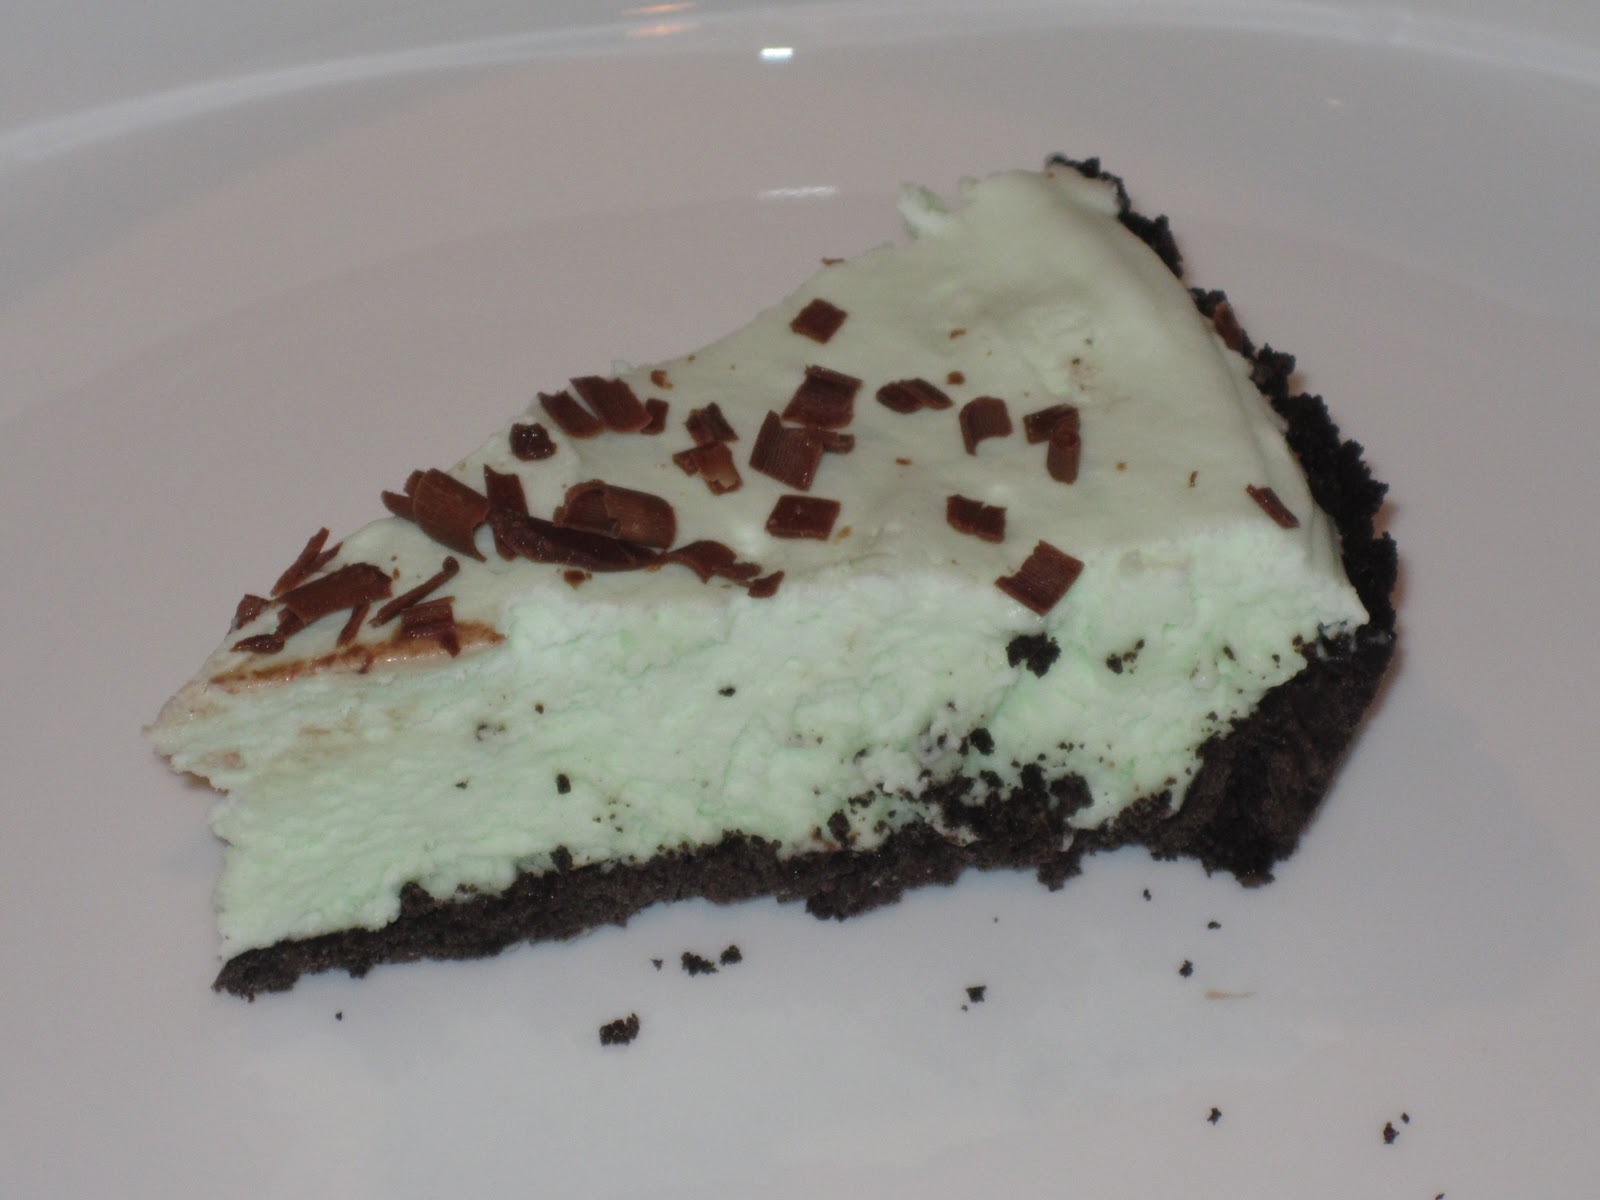
-1 chocolate pie crust
-32 large marshmallows
-1/2 cup milk
-1/4 cup creme de menthe
-3 tablespoons white creme de cocoa
-1 1/2 cups chilled whipping cream
-few drops green food coloring, optional
-chocolate shavings

In a saucepan on medium heat melt the marshmallows and the milk together. Once melted pour into a bowl and refrigerate until cool. Whisk in the creme de menthe and the creme de cocoa. With an electric mixer whip the cream until stiff. Fold into the marshmallow mixture and add food coloring. Pour into prepared crust and freeze for at least 5 hours. Sprinkle chocolate shavings on top right before serving. Enjoy.

Friday, February 18, 2011

Chicken Caesar Salad

Classically delicious Caesar Salad recipe... Make me!

Ingredients

  • 3/4 teaspoon garlic paste (finely grated garlic)
  • 3 tablespoons lemon juice
  • 1 teaspoon dijon mustard
  • 1/2 teaspoon Worchestershire sauce
  • 6 anchovy filets made into paste
  • 2 large egg yolks
  • 5 tablespoons canola oil
  • 5 tablespoons olive oil
  • 3/4 cup grated parmesan cheese
  • freshly grated pepper
  • 2-3 heads of romaine lettuce
  • 2 grilled chicken breasts
  • Croutons (homemade are best, but any will work)
In a large bowl whisk together the garlic paste and lemon juice. Let sit for 10 minutes. Add the Worchestershire sauce, anchovies, and egg yolks and whisk to combine. Slowly drizzle in the olive oil while whisking. Add the parmesan cheese and stir together. 

Cut the romaine into bite sized pieces and add to bowl with dressing. Toss with tongs and add a bit more parmesan and the croutons. Plate and place sliced chicken breast on top. 

Makes enough for 3-4 main course servings or 6 side servings. 

** I also added avocado to this recipe, which gave it an extra richness- thanks for the idea, Maryssa!

Monday, February 7, 2011

Texas Sheet Cake!

This is the second time I've made this cake- this time I added more chocolate and it was even more delicious. Its a really easy cake to make and is extremely portable, since it is frosted and served directly from the pan in which it is baked. It is almost a mix between a sheet cake and a brownie... so obviously it was adored by yours truly. Its really very very very good. MAKE THIS CAKE.


INGREDIENTS
-2 cups all-purpose flour
-2 cups sugar
-1 teaspoon baking soda
-1/2 teaspoon salt
-1/2 cup sour cream
-2 eggs
-1 cup butter
-1 cup chocolate chips
-1 cup coffee
-5 tablespoons unsweetened cocoa

FROSTING
-6 tablespoons milk
-5 tablespoons unsweetened cocoa
-1/2 cup chocolate chips
-1/2 cup butter
-2 1/2 cups confectioner's sugar
-1 teaspoon vanilla 
                  
Preheat oven to 350 degrees F. Grease and flour a 9x13 inch pan.

Using an electric mixer beat together the sour cream and eggs. In a separate bowl combine the flour, sugar, baking soda and salt and set aside. Melt the butter on low in a saucepan, add the coffee and 5 tablespoons cocoa. Bring mixture to a boil then remove from heat. Add chocolate chips and stir until melted. Allow to cool slightly, then stir cocoa mixture into the dry ingredients, mixing until blended. Pour into sour cream and eggs and beat on low until mixed. 

Pour batter into prepared pan. Bake in the preheated oven for about 25 minutes, or until a toothpick inserted into the center comes out clean.

For the icing: In a large saucepan, combine the milk, 5 tablespoons cocoa and 1/2 cup butter. Bring to a boil, then remove from heat. Stir in the confectioners' sugar and vanilla, mixing until blended. Spread frosting over warm cake.

Chocolate Covered OREOS


I made these the other night out of default— I had only 1 tablespoon of butter and no oil and thus was quite limited with what I could make for dessert. I scoured my pantry and remembered a friend making chocolate covered Oreos a few years ago. I gave these a whirl… they were SO easy, SO fast, really tasty and look much more impressive than they should. All-in-all these are winners. 
INGREDIENTS
  • 20 Oreos
  • 1 bag semi-sweet chocolate chips
  • 1/2 cup white chocolate chips
  • 1 tablespoon butter
Melt the chocolate chips and butter over a double boiler (or in the microwave in 15 second increments). Stir until smooth. Drop an Oreo into the melted chocolate and cover with chocolate. Scoop up the Oreo with a fork and lightly tap the fork against the side of the bowl to let the excess chocolate drip off the cookie. Place on wax paper and let cool/harden. Continue with other cookies. 
Melt the while chocolate in a double boiler (or in the microwave in 15 second increments) and stir until smooth. Transfer into a piping bag or a small ziplock bag and cut a small corner out. Pipe the white chocolate onto the chocolate covered-cookies. Let cool.
These do well if stored in the fridge… Serve and enjoy!

Veal Scallopini Piccata


Almost a year ago I had Veal Piccata at an Italian restaurant in Michigan when celebrating my Grandpa’s 90th birthday. I had never tasted anything so incredibly delicious and I have wanted to recreate the dish ever since. Despite the fact that it took a village to make this dish (thanks to my dad who drove the veal from NC to TN, my mom for the serving platter, America’s Test Kitchen, & my FGN friends), it was actually quite easy to make… The real reason that this took so long was that I basically agonized over it for about 10 months, which I am convinced improved the flavor. 
It. Was. Good. So. Good. The sauce was so flavorful-light and rich, if that makes sense, and I am glad that I doubled the recipe for the sauce. The veal itself was just about perfect- although I will cook it a second less next time.
It took all I had inside me to not have the leftovers for dessert… and by dessert I mean the “dessert” AFTER the huge piece of chocolate cake that I had for dessert after my huge serving of veal for dinner. 
And lastly, why would anyone ever eat chicken when veal exists? To those of you who have moral qualms with eating baby cow: your loss. 
INGREDIENTS
  • 2 lb. veal scallopini (or cutlets, pounded very thin ~1/8inch 
  • 1 teaspoon meat tenderizer (if pounding the veal yourself)
  • freshly ground pepper
  • 1 cup flour
  • 4 tablespoons vegetable oil
Once veal is scallopini-ed pat each dry with a paper towel and sprinkle tenderizer on it (if using). Sprinkle both sides of each piece of veal with a bit of pepper. 
Meanwhile, heat 1 tablespoon of oil in a 12-inch skillet until smoking. Dunk ONE side of the veal in the flour and shake off. Place in the hot skillet flour-side-down. Cook, without moving, for about a minute or a minute and a half, until lightly browned. Turn over and cook another 30 seconds or so (these need just moments of cooking). Remove from pan and place on a baking sheet in a warm oven (170 degrees). Continue cooking the rest of the veal the same way, only flouring one side, and adding more oil to the pan as needed.
Once finished, make the PICCATA SAUCE
  • 4 tablespoons vegetable oil
  • 2/3 cup diced shallots
  • 3 cups chicken broth (I used Better Than Bouillon and it was AWESOME)
  • 4 tablespoons fresh chopped parsley
  • 4-5 tablespoons butter
  • 4 tablespoons freshly squeezed lemon juice
In the same skillet as the veal add the vegetable oil and heat (don’t clean out the pan). Add the shallots and cook for about 1 minute. Add the chicken broth and let simmer until reduced by about half (this took about 10-12 minutes). Whisk in the parsley, butter, and lemon juice. Taste for salt and pepper. Pour over the veal and serve immediately. 
I served this over angel hair pasta and there was just the right amount of sauce to douse your pasta and veal. This makes enough to serve 6. 

Worms in Dirt


Okay, so the other day I randomly started craving dirt and worms… I have no idea what made me think of it, and I honestly do not know how long its been since I’ve had this birthday party treat- maybe 15…20 years? It was a serious craving and I managed to wrangle a friend into coming over the next night to help me make and eat them (I’m a demanding friend). It was better than I remembered it being. We each made our own pot-o-dirt and decorated it with worms to our liking. Yummy. Will be making again… soon. Makes 4 servings.
  • 1 package instant chocolate pudding mix
  • 2 cups cold milk
  • 1 cup whipped cream/cool whip
  • ~10 oreos
  • Gummy worms (SOUR are best!) or any other treats you want to decorate with
Whisk the pudding and milk together according to package directions. Set aside for a few minutes to let thicken. Stir in the whipped cream. 
In a food processor crush the oreo cookies. 
Layer the oreos and pudding however you see fit. Decorate with worms. 
EAT. MOAN. FEEL 5 YEARS OLD AGAIN. Its worth it. 

Best Ever "Fancy" Mac-N-Cheese


Oh boy. This was incredible. Un-****ing-believable. Make it instantly. The bacon… the onions… the cheese. Just make it. Adapted from www.thepioneerwoman.com
  • 1 lb. elbow pasta
  • 8 tablespoons butter
  • 2 whole medium onions, halved then thinly sliced
  • 10 slices bacon
  • 1/4 cup flour
  • 2 cups milk
  • 1/2 cup half-and-half
  • 2 egg yolks, beaten
  • 3/4 cup gruyere cheese
  • 3/4 cup white cheddar
  • 3/4 cup parmesan 
  • 4 ounces goat cheese
  • salt and pepper
Boil the pasta for half the time of the directions on the box. Drain and set aside.
Cook the bacon until almost crispy. Place on paper towels, crumble and set aside. Save 1 tablespoon of the bacon grease, set aside for later. 
In a skillet melt 4 tablespoons butter and saute the onions on medium-low until lightly browned. 
In a large pot melt the rest of the butter and 1 tablespoon of the bacon grease. Sprinkle in the flour and whisk to combine. Cook, stirring constantly, for 1 minute over medium heat. Add the milk and half-and-half and whisk to combine. Cook for 3-5 minutes until thick. Reduce heat to low and add salt and pepper. 
Beat egg yolks and add 1/4 cup of the warm milk mixture to the eggs while stirring, then add the eggs to the pot. Stir to combine and cook for another minute.
Add all the cheeses to the pot and stir until melted. Add most of the onions and bacon and stir to combine. Add the pasta and stir to combine (I did not end up using all the pasta, you want to make sure its extra ooey-gooey). Taste for salt and pepper. Pour into a 9x13 baking dish and sprinkle the rest of the bacon and onion on top. Bake in 350 oven for 15-25 minutes, until hot and bubbly. 
Serve and enjoy! Mmmmm. 

White Chocolate Banana Pudding Cheesecake


I’ll give you a minute to let that sink in. 
Yep. 
Uh huh.
Oh, and it has a Nilla Wafer Crust. Its true. 
I had this cheesecake last month at my favorite restaurant in Durham, NC when I was home for my dad’s retirement party. When I saw it on the menu I’m pretty sure that drool fell out of my mouth onto the table. Clearly, I ordered it and did my best to make a barrier with my arms between my family and the cheesecake so I didn’t have to share 1 bite. I’ve thought about it every day since and when my dad came to visit me last weekend we decided that we would do our best to recreate it. We did a pretty darn good job of it- and next time it’ll be perfect. 
CRUST
  • 1 1/3 cup crushed Nilla Wafers 
  • 1 tablespoon sugar
  • 4 tablespoons butter, melted
Preheat oven to 350 degrees.
In a food processor, crush the Nilla Wafers. Pour into a bowl and add the melted butter and sugar. Stir to combine. 
Pour into a greased springform pan. With your hands press the crust down on the bottoms and about 1/2 inch up the sides. Bake in the oven for about 10 minutes. 
CHEESECAKE
  • 3 8-ounce packages of cream cheese
  • 8 ounces sour cream
  • 1 cup sugar
  • 1 tablespoon lemon juice
  • 1 teaspoon banana extract (maybe more if you want)
  • 4 eggs
  • 1 1/4 cups white chocolate chips, melted
With an electric mixer beat the cream cheese and sour cream until smooth. Add the sugar, lemon juice, and banana extract and beat until smooth. Add the eggs one at a time, beating until incorporated. Add melted chocolate and beat just until combined. 
Pour into prepared pan and bake for 50-60 minutes. Cheesecake will still have a little jiggle and be slightly golden on the edges. Let cool completely and the refrigerate for 4+ hours. Serve with sliced bananas and whipped cream, if you so desire. ENJOY. 
P.S. If you want to avoid the top of the cheesecake cracking you may want to bake it in a water bath, however, I’ve had such bad experiences with springform pans in water baths that I didn’t want to chance it… Yes, my cheesecake had a huge crack down the center-  and yes, it still tasted out of this world. 

Simple Sesame Noodles


Although I already have a go-to sesame noodle dish, I recently came across this one which is easier, lighter, and faster than the previous post that I shared months ago. I might like these more??? I added a small amount of peanut butter because I wanted it to have a slightly richer taste- you could add it or not. I made these a few nights ago and I will likely make them again later this week. You could add a protein if you wanted or any other veggies that you think would go nicely. They’d also be great for a potluck as they taste equally delicious hot and cold. Adapted from www.thepioneerwoman.com
  • 12 ounces thin spaghetti
  • 1/4 cup soy sauce 
  • 2 tablespoons sugar
  • 3 cloves garlic, minced
  • 2 tablespoons rice vinegar
  • 4 tablespoons sesame oil 
  • 3/4 teaspoon hot chili oil
  • 3 tablespoons canola oil
  • 2 tablespoons hot water
  • 1-2 tablespoons peanut butter
  • 4 scallions, thinly sliced
  • 1 red bell pepper, thinly sliced
Boil pasta according to directions. 
Meanwhile, combine all the ingredients for the sauce, whisking together until everything is incorporated. 
When pasta has been drained, pour into a large bowl and pour sauce and veggies on top. Toss together with tongs. Serve. Enjoy. Devour. Make again. 

Red Velvet Birthday Cake!


We were recently celebrating a dear friend’s birthday and one of her favorite cakes is Red Velvet. I’d never made one before but thought I’d give it a whirl. I didn’t have the highest of expectations because it sort of weirds me out that its not really vanilla cake and its certainly not really chocolate since most recipes barely add any cocoa… not to mention you have to put (SO MUCH) food coloring in this cake to make it red. HOWEVER, after adding ungodly amounts of cocoa (against the best advice of the many recipes that I looked at, and therefore ungodly amounts of food coloring, whoops) this cake truly was AWESOME. I will absolutely make this again. Also, big thanks to my special cake decorating friend who was the brains and the brawn behind the majority of this decorating endeavor. Adapted from www.smittenkitchen.com
  • 3 8-9” round cake pans
  • 1 tablespoon butter
  • 3 1/2 cups cake flour
  • 3/4 cup cocoa powder (not dutch processed)
  • 1 1/2 teaspoons salt
  • 2 cups canola oil
  • 2 1/4 cups sugar
  • 3 large eggs
  • 1 teaspoon red gel food coloring dissolved in 6 tablespoons of water
  • 1 1/2 teaspoons vanilla
  • 1 1/4 cup buttermilk
  • 2 teaspoons baking soda
  • 2 1/2 teaspoons white vinegar
Preheat oven to 350 degrees*. Place a teaspoon of butter in each of the 3 cake pans and place in oven just until melted. Remove from oven and use the butter to grease the sides and bottom of each pan and line bottoms with wax or parchment paper. 
In a medium bowl whisk the flour, cocoa, and salt. Set aside.
Place oil and sugar in a bowl of an electric mixer and beat on medium until well incorporated. Beat in eggs one at a time. Turn machine to low and slowly add the food coloring- careful not to splash! Add vanilla. Slowly add the flour mixture alternatively with the buttermilk in two batches. Scrape down bowl and beat only until just mixed. 
In a small bowl mix the baking soda and vinegar- watch it fizz! Slowly add this to the cake batter while beating- mix for about 10 seconds. Pour cake into prepared pans and bake for about 30-45 minutes. Check with a toothpick- watch out these little guys may cook faster than you think! I baked in two batches because I’ve had bad experiences with trying to shove all three cakes in my oven at once. Use your best judgment. Remove from oven and let cool completely. 
CREAM CHEESE FROSTING
This is a big cake. If you want it to be well-iced (between layers, around the sides and on top) you’ll need a lot of frosting. This. Is. Good. Frosting. 
  • 4 8-ounce cream cheese, very cold!!
  • 1 cup butter, softened
  • 2-4 cups confectioners sugar (depending on how sweet you like it)
  • 2 teaspoons vanilla extract
With an electric mixer beat the cream cheese and butter until creamy and smooth. Add the confectioners sugar a bit at a time, tasting as you go (yay!). When it has reached desired sweetness, add the vanilla and beat until incorporated. Frost cooled cake to your liking! 
SERVE AND ENJOY!!!
* Note: I actually baked mine at 340 because my oven is not convection and cooks things unevenly- I wanted a slightly slower bake so that the edges didn’t burn.