Search This Blog

Monday, December 17, 2012

Apple Cider Caramels

I spent my weekend getting ready for the holidays by wrapping presents and making candy. In addition to my favorite holiday candy (Peppermint Bark), I made these apple cider caramels. Wowza, these have some serious flavor. They taste like a bite-sized caramel apple with tiny bits of sea salt that you notice as you chew on them. Goodness, they are good. And as far as candy making goes, these were really simple and are jam-packed full of flavor. Make them! Recipe adapted from Smitten Kitchen.

INGREDIENTS
4 cups apple cider (not juice)
1 cup granulated sugar
1/2 cup light brown sugar, packed
1 stick butter, cut into pieces
1/3 cup heavy cream
1/2 teaspoon ground cinnamon
1 teaspoon sea salt
1 candy thermometer

Pour the apple cider into a 3 quart saucepan and place on the stove over high heat. Bring to a boil, stirring occasionally, and let reduce until the liquid measures about 1/2-1/3 cup (this will likely take 30-45 minutes). 

Meanwhile, measure out the sugars, butter, and cream and set aside. In a small bowl stir together the salt and cinnamon and set aside. Prepare an 8x8 inch baking pan by lining two strips of parchment paper on the bottom, leaving extra hanging off the top for easy removal once the caramel hardens. Set aside.

Once the apple cider has reduced, remove from heat and add the sugars, butter, and cream and stir to combine. Put back on the burner on medium-high heat and bring to a boil until the mixture reaches a temperature of 252 degrees F (about 5 minutes). Promptly remove from heat, stir in the cinnamon/salt mixture and pour into the parchment paper-lined pan. Let cool/harden on the counter (~2 hours) or in the fridge (faster). 

Once hardened, remove the caramel by pulling up on the sides of the parchment paper and place on a cutting board. Using a well oiled sharp knife, cut into 1-inch squares and wrap in parchment/wax paper, twisting the sides to keep the caramel sealed. These will keep fresh for approximately 2 weeks on the counter. You can store them in the fridge, but I found them to be too hard when cold and just perfect when room temperature. 

Wednesday, December 12, 2012

Hot Cocoa Mix

Every year around this time I try to find some type of edible DIY gift. Last year I made vanilla extract and used it as stocking stuffers for my family. This year I stumbled upon this Hot Cocoa Mix that looked delicious and decided to make good use of a work-from-home day and made a bunch of these jars to give away (but not before trying a cup of hot cocoa first!). Its a very rich and chocolatey cocoa. Top notch!

INGREDIENTS
4 cups granulated sugar
3 tablespoons vanilla extract
1 pound semi-sweet chocolate, chopped
1 pound milk chocolate, chopped
2 cups cocoa powder

In a food processor pulse together the sugar and vanilla until combined and smooth. Pour into the bottom of a very large bowl. Add half the chocolate to the food processor and process until completely ground (do not pulse too long, or else the oils will be released and it will start to clump together). Once all the chocolate is pulsed/ground, pour it into the bowl with the sugar. Finally add the cocoa powder and whisk to combine all ingredients. You may need to break up any small clumps of cocoa or ground chocolate as you whisk. 

Pour into jars and close tightly. Attach a note with directions on how to make each cup of cocoa. Directions are as follows: Warm 1 cup (8 oz.) of milk in a microwave or on the stove. Add 3-4 tablespoons of cocoa mix and stir together to combine. Serve and enjoy!

Will last approximately 10 months. 

Tuesday, November 13, 2012

Thanksgiving Recipe Round-Up

Thanksgiving is just around the corner... it snuck up on me! As always, I am spending the holiday with my grandparents in Michigan, where I will get my fill of fresh apple cider, chili-dogs, and midwestern charm. Our Thanksgiving dinner menu never changes, but in case your does, here are a few of my favorite fall/winter side dishes that could go well with your Thanksgiving turkey this year. Enjoy!

Roasted Butternut Squash Bisque 


Arugula and Grapefruit Salad


My Grandma's Thanksgiving Stuffing


Chocolate Bourbon Pecan Pie


Pumpkin Pumpkin Pie


Chewy Molasses Cookies

Sunday, October 7, 2012

Vanilla Bean Buttermilk Pie


Buttermilk pie is one of the greatest desserts. I ate it often growing up because my childhood friend's mother made the best buttermilk pie in the world. I haven't had it in years (not for lack of trying, though... there was one buttermilk pie failure with friends in NYC a few years ago), but I stumbled upon this recipe a few days ago and brought it to a friend's house for dessert this weekend. It was delicious. The vanilla bean in this recipe definitely added another layer of flavor and this pie hit the spot. A southern classic! Make sure you don't overcook the pie- you want it to be just barely set so that its still custardy when you serve it. *Adapted from Karen Barker's Sweet Stuff.

INGREDIENTS
1 9-inch raw pie crust (store bought or homemade)
1 cup sugar
4 large egg yolks
1 vanilla bean, seeded
1/4 cup cornstarch
1/8 teaspoon kosher salt
1 1/2 cup buttermilk
1/2 cup heavy cream
3 tablespoons melted butter

Preheat oven to 425 degrees. Pre-bake the pie crust for 10 minutes with parchment paper lining the crust and pie weights or beans on top of the parchment paper. Remove crust from oven and reduce oven temperature to 350 degrees.

In a large bowl whisk together the sugar, egg yolks, vanilla bean seeds, cornstarch, and salt. The mixture will be very thick. Slowly whisk in the buttermilk and cream until well incorporated. Slowly stream in the melted butter and whisk well. Pour into the bottom of the (slightly) pre-baked crust and bake at 350 degrees for 15 minutes. Then turn the oven temperature down to 325 and bake another 30 minutes, until pie is just set in the middle but still jiggly. Remove from oven, let cool to room temperature. Serve slightly chilled.


Sunday, September 30, 2012

Rustic Plum Tart


This is hands down the easiest dessert I have ever made. It took 5 minutes to put together, 40 to bake, 15 to cool, and 2 to devour. It was so tasty, even my non-dessert eating friend ended up finishing his first, and then tilted his plate toward his mouth to sip the last few drops of ice creamy-plum syrup. Serves 6 with 1 scoop of ice cream on each plate. *Adapted from Sunny Anderson's recipe on Food Network.

INGREDIENTS 
1 raw and chilled pie crust, homemade or not (enough for a 9-inch pie)
1 lb. ripe plums
1 tablespoon flour
1/4 cup apricot jam
1 egg, plus 1 tablespoon of water (egg wash)
1 teaspoon sugar

Take the pie crust out of the refrigerator and let sit on the counter for about 10 minutes. Preheat the oven to 425 degrees and line a cookie sheet with parchment paper.

Meanwhile, pit and slice the plums into 1/4-inch wedges. Place in a medium bowl and sprinkle with flour. Toss with your hands to coat. This will help thicken the tart as it cooks so you're not left with a goopy soggy mess. Not that a goopy soggy mess wouldn't still be delicious... because it would.

Next, roll out the pie crust into a thin circle, measuring about 12-inches in diameter and place on the cookie sheet. Spoon the apricot jam on the bottom of the crust in a circle, ending about 2-inches from the edge. Pour the plums on top of the jam and spread in an even layer. Fold the edges of the crust over the plums, leaving the center exposed and press lightly to seal. Brush the edges with the egg wash and sprinkle with sugar. Bake for 35-45 minutes, until deep golden brown and bubbly. 

Let cool 15 minutes, slice into 6 pieces (like a pizza) and serve with a scoop of vanilla ice cream on top!

Sunday, September 23, 2012

The Best Challah French Toast

When I was a kid, my mom would make challah (a brioche-like egg bread) every Friday night and it always turned into the best french toast the next morning. She still makes challah every Friday night, but the difference is that I no longer live at home, so I miss out on the opportunity for weekly challah french toast.

BUT, my mother is the best mother in the history of the world, and this week she over-nighted me a package with the perfect loaf of homemade challah inside. I invited a girlfriend over for brunch this weekend and made her an updated version of the challah I grew up making. And it was a hit!
Serves 4.


INGREDIENTS
8 (3/4-inch) slices of challah bread
4 large eggs
1 cup milk/half-and-half
1/2 teaspoon vanilla extract
2 tablespoons orange juice
"some" ground nutmeg
"a lot" of cinnamon
butter & canola/vegetable oil

Preheat oven to 250 degrees and place a cookie sheet on the middle rack.

In a 9x13 pan, whisk together the eggs, milk, vanilla, oj, a pinch or two of ground nutmeg and a bunch of shakes of ground cinnamon. Make sure to really incorporate the cinnamon into the wet ingredients. Take each piece and dunk in the egg mixture, for about 1 minute per side and place in a skillet set on medium heat with a bit of butter and oil in the bottom. Cook for ~2-3 minutes per side, or until perfectly golden brown. Flip and cook the other side the same. Once cooked on both sides, place on a cookie sheet in the preheated oven to keep warm while the rest of the bread is cooking. Continue to add more nutmeg and cinnamon to the egg mixture as needed, whisking to incorporate, and continue dipping and cooking the bread the same way.

Serve with a sprinkling of powdered sugar on top and a maple syrup drizzle. Mmm mmm mmm.

Friday, September 21, 2012

Fish Tacos

I made fish tacos this week to satisfy a mexican food craving. I combined a few recipes and the end result was a delicious and flavorful taco. Although it is not pictured, the cilantro-lime crema is ESSENTIAL. Adapted from Cooking Light. Serves 4.

TACO INGREDIENTS
1 1/2 pound flakey fish (tilapia, red snapper)
1 lime, juiced
2 tablespoons orange juice
2 tablespoons taco seasoning
2 cups shredded cabbage
cilantro-lime crema
8 corn tortillas

Mix together the lime juice, orange juice, and taco seasoning and pour into a large ziploc bag. Add the fish to the bag, and seal the bag, taking all the air out. Marinade for 20 minutes.

Meanwhile, head the oven to 425 degrees and spray a cookie sheet with non-stick spray. Take the fish and place in a single layer on the cookie sheet and bake for ~9 minutes, or until flakey.

While the fish is in the oven, make the cilantro-lime crema by stirring together the following ingredients.

Cilantro-Lime Crema Ingredients
4 tablespoons sour cream
2 tablespoons mayonnaise
1/4 cup green onions, thinly sliced
1/4 cup cilantro, chopped
1 teaspoon lime zest
2 teaspoons fresh lime juice
1/4 teaspoon salt
1 garlic clove, minced

Once fish is cooked and cilantro-lime crema has been prepared, heat the tortillas according to package directions. Flake the fish and place into hot tortillas, top with shredded cabbage, and lime crema. Serve with any other toppings (guacamole, salsa, etc.) and enjoy!


Friday, September 14, 2012

S'mores Bars

S'mores! Without a fire! These were very fun to make and were a yummy Friday treat.

INGREDIENTS
1 stick unsalted butter, softened
3/4 cup sugar
1 large egg
1 1/2 teaspoons vanilla extract
1 1/3 cup flour
3/4 cup graham cracker crumbs
1 teaspoon baking powder
1/4 plus 1/8 teaspoon kosher salt
4 (1.5 oz) Hershey's Milk Chocolate Bars
1 (7 oz) jar of Marshmallow Creme/Fluff

Using an electric mixer, beat together the butter and sugar until light and fluffy. Add the egg and vanilla and beat until incorporated, scraping down the sides once. In a separate bowl, mix together the flour, graham cracker crumbs, baking powder, and salt and add to the butter mixture, beating just until incorporated. 

Press half of the dough into the bottom of a lightly greased 8x8 or 9x9 pan. Spread the marshmallow creme on top in an even layer and top with an even layer of the chocolate bars (break up as needed to fit). Press the rest of the dough on top and bake for 20-25 minutes in a 350 degree oven. 

Remove from oven, let cool, cut into squares and serve! 

Tuesday, September 4, 2012

Late Summer Cheese Plate


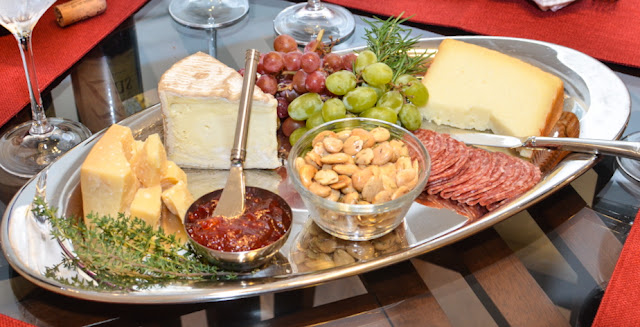
I don't usually post things like this, since I didn't actually make any of the edible items in this picture... But I've been feeling guilty about my lapse in blogging and am probably over-compensating by posting anything I can deem even adequately appropriate for a food blog. Also, whenever I can get Jason (my favorite photographer) to take pictures of my food, I jump at the opportunity. And this picture is just too pretty to not post.

The fun thing about making a cheese plate/board is that you can add whatever you want to it and take out whatever you don't like, you can change it based on the season, or pick items based on what wine you'll be drinking. In general, when I'm making a cheese plate, I try to find a few different types of cheese (1 soft, 1 hard, 1 semi-hard), one kind of fruit, one kind of meat, one kind of finger food, and one kind of dip or relish. Below are some of my favorite potential combinations.

CHEESE PLATE INGREDIENTS
1 Soft Cheese
     - Triple Cream Brie
     - Burrata
     - Boursin
     - Goat cheese
1 Hard Cheese
     - Parmesan
     - Asiago
     - Romano
1 Semi-Hard Cheese
     - Cheddar
     - Manchego
     - Roquefort/Stilton
     - Edam
1 Meat/Charcuterie
     - Salami
     - Prosciutto
     - Soppressata
1 Fruit
     - Grapes
     - Sliced pear
     - Sliced apple
     - Figs
1 Finger Food
     - Marcona Almonds
     - Mixed nuts
     - Olives
1 Relish/Spread
     - Pepper relish
     - Pesto
     - Honey

Once you have bought and prepared all of your ingredients, place them on a large plate and decorate with fresh herbs or greens. Then... devour it!

Monday, September 3, 2012

Coconut Layer Cake


It has been over 6 weeks since my last blog post. I'm embarrassed. The truth is that I've actually been working on my dissertation proposal and internship applications (you can't stay in graduate school forever, apparently) and they've taken up a lot of my time and energy. Whereas I don't think this excuses my lack of cooking and posting, I guess it is an acceptable explanation. But, this long holiday weekend was a welcomed treat and I was able to spend a lot of time in my kitchen.

My first task was this coconut cake. And as you probably know, I love baking cakes. It is time consuming, but, like bread-making, the end result is so rewarding after investing that much time, attention, and care. Not only was the finished product absolutely the best coconut cake I've ever had, but it looks stunning when sliced (thanks to Jason Volpe's photography). It was a crowd pleaser and a perfect end to a wonderful dinner. You should make this before summer is over! Recipe adapted slightly from Cook's Illustrated.

CAKE INGREDIENTS
1 large egg
5 large egg whites
3/4 cup coconut cream (not milk)
1/4 cup water
1 teaspoon vanilla extract
1 teaspoon coconut extract
2 1/4 cups cake flour (9 ounces)
1 cup granulated sugar
1 tablespoon baking powder
3/4 teaspoon table salt
12 tablespoons unsalted butter (cut into 12 pieces, softened, but still cool)
2 cups packed sweetened shredded coconut

BUTTERCREAM INGREDIENTS
5 large egg whites
1 cup granulated sugar
pinch of table salt
3 1/2 sticks unsalted butter, cut into about 20 piece, softened, but still cool
1/3 cup coconut cream
1 teaspoon coconut extract
1 teaspoon vanilla extract

Making the cake...
Preheat oven to 325 degrees and adjust oven rack to lower middle-position. Grease 2 8-inch round cake pans with shortening and dust with flour.

In a large measuring cup, beat egg whites, whole egg, coconut cream, water, vanilla, and coconut extract and beat with a fork until thoroughly combined.

In the bowl of a standing mixer, combine the flour, sugar, and salt and mix on lowest speed with the paddle attachment for about 30 seconds. While mixer is running, add the butter, 1 piece at a time then beat until mixture resembles coarse meal, with butter bits no larger than small peas (2-2 1/2 minutes).

With mixer still running, add 1 cup of the reserved liquid, increase speed to medium-high and beat until light and fluffy, about 45 seconds. While mixer is still running, add remaining 1 cup of liquid in a stead stream. Scrape down the bowl and beat to combine. Divide batter between the two cake pans and level with a spatula. Bake until cakes begin to pull away from sides of pans, and toothpick inserted comes out clean (about 25-30 minutes). Cool pans on wire racks about 10 minutes, then invert cakes onto racks to cool to room temperature.

While oven is still on, spread the coconut on a rimmed baking sheet and toast for about 10-20 minutes, stirring every few minutes so that the coconut browns evenly. Cool to room temperature and set aside for the cake assembly.

Making the buttercream icing...
Combine egg whites, sugar, and salt in the bowl of a standing mixer; set bowl over saucepan containing 1 1/2 inches of barely simmering water. Whisk constantly until mixture is opaque and warm to the touch (~120 degrees), about 2 minutes.

Transfer bowl to mixer and beat egg whites on high speed with whisk attachment until barely warm (~80 degrees) and whites and glossy & sticky, about 7 minutes. Reduce speed to medium-high and beat in butter, 1 piece at a time. Beat in coconut cream, and coconut & vanilla extracts. Stop mixer, scrape down bowl, and continue to beat until well combined.

Assembling the cake...
With a long serrated knife, cut both cakes in half horizontally, so you have 4 thin layers of cake in total.

Center one layer of cake on a cake stand (you can steady the layer by putting a dab of icing on the bottom of the stand before placing the first layer on top). Spread icing on the top of the first layer and spread with a knife or spatula (the layer of icing should be about ~1/4 inch thick). Repeat with remaining layers. Once you place the top layer on, spread the remaining icing on the top and sides of the cake. Take the toasted coconut and sprinkle on top and press into the sides. Cut slices, serve, and enjoy! Cake can be stored in the fridge if you want, but the cake is best served room temperature (or slightly cool), so take it out hours before serving.

**** If you want to make this ahead of time: bake the cakes the day before, let cool completely, wrap in plastic wrap and store in the fridge overnight. Ice and assemble the following day.

Thursday, July 19, 2012

Parmesan Chicken


This is an outstanding, flavorful, and simple chicken recipe. I have no idea why it took me so long to make it, but I'm very glad I finally did (I made it for the first time 4 weeks ago and have made it 3 times since then.. its that good). It is an Ina Garten recipe from her cookbook Barefoot Contessa: Family Style and I have adapted it slightly. Serves 4.

INGREDIENTS
4 (~8oz) boneless skinless chicken breasts
1 cup flour
1 teaspoon kosher salt
1/2 teaspoon pepper
2 large eggs
1 tablespoon water
1 cup seasoned breadcrumbs
1/2 cup freshly grated/ground parmesan (or more if you want)
1 1/2 tablespoons olive oil
1 1/2 tablespoons butter
1 lemon, halved and seeded

Take each chicken breast and pound until it is ~1/2-inch thick, using a meat mallet or a rolling pin. Cut each breast in half (you will have 8 thin chicken tenders). 

Mix together the flour, salt, and pepper in a dinner plate and set aside. Whisk together the eggs and 1 tablespoon of water in a dinner plate and set aside. Finally, mix together the breadcrumbs and the parmesan together in a dinner plate and set aside. 

Heat a large skillet over medium heat and once hot, add half the olive oil and butter. Dredge each side of each chicken breast first in the flour mixture, then in the egg mixture, then in the breadcrumb mixture, lightly patting the breadcrumbs to help them adhere. Place in the hot pan and let sizzle away. Sprinkle a little more salt on top, if you think it needs it, and squeeze a bit of lemon juice onto each cutlet as it is cooking. Once lightly browned, flip and cook on the other side- these do not take long to cook. Remove chicken from pan, add more olive oil and butter as needed and keep frying the chicken. 

Serve with a light salad of mixed greens. Mmmm-mmm-mmm. 

Sunday, July 15, 2012

Blackberry Gin Fizz


I first saw this recipe earlier this month in the August 2012 issue of Bon Appetit. I drooled over the picture and recipe and then forgot about it until last week when Smitten Kitchen made and posted her version... beat me to the punch. It was good timing, though, because my folks were in town this weekend and I thought this was the perfect occasion to try a new cocktail.

And ohhh boy. Let me tell you about this cocktail. It is to die for. It goes down so easily that you can literally chug it, the way you'd take a bottle of lemonade from the fridge on a hot day and down the entire thing in 3 huge gulps. You will find yourself making another batch before you're even halfway finished with the first batch, because god-forbid you have to wait 5 minutes between tastes. Just do yourselves a favor and make this.

Serves 8.
Or 4 people twice.
Or 2 people four times.


INGREDIENTS
5-oz. ripe & juicy blackberries
4 ripe & juicy strawberries OR 10 ripe & juicy raspberries OR another yummy fruit
1/2 cup granulated sugar
1 cup freshly squeezed lime juice
2 cups gin
2 cups club soda
basil leaves

Using a food processor (or immersion blender) puree the berries and sugar until smooth. Let sit for about 10 minutes, stirring occasionally, until the sugar dissolves. Pour into a strainer set over a bowl to separate the fruit juice from the seeds; discard seeds. You should have about 3/4+ cup of berry juice.

In a large pitcher combine the berry juice, lime juice, and gin and stir well. Pour equal amounts in the bottom of each glass, add a handful of ice cubes, stir again, then top with equal amounts of club soda. Give it a quick and light stir and top with a basil leaf or two. Serve and enjoy!

Saturday, July 7, 2012

Spicy Green Tomato Soup with Shrimp


This is another recipe from chef Ben Barker at the restaurant formerly known as Magnolia Grill (RIP). Yet another awesome soup that can be served hot or cold, which is a nice option for the serious heat-wave that we're experiencing. I've adapted it ever-so-slightly. Serves 8; soup base freezes beautifully.

SOUP INGREDIENTS
4 ounces pancetta, diced
1/2 (scant) cup vegetable oil
2 medium onions, peeled and sliced thin
6 cloves garlic, minced
2 jalepenos, stemmed and sliced, with seeds
4 green poblano/pasilla chiles, stemmed, seeded and sliced
2 small cans fire-roasted diced green chiles
2 bay leaves
3 1/2 pounds firm green tomatoes, cored and cut into eighths
6 cups chicken broth
1 cup basil leaves
3 tablespoons lemon juice
a few dashes of tabasco, to taste
salt & pepper

GARNISH INGREDIENTS
2 whole red tomatoes
1 1/2 pounds shrimp, peeled and deveined
garlic powder, paprika, salt & pepper
4 ounces cooked pancetta (from above)
1 cup sour cream, thinned with 2 tablespoons milk

Heat the pancetta and oil in large soup pot over medium heat until the fat is rendered from the pancetta and its nice and crispy. Remove the pancetta, reserve for later. Add the onions to the hot oil and cook, stirring occasionally until soft, but not browned. Add the garlic, jalepenos, poblano/pasillas, diced green chiles, and bay leaves and cook for 5 minutes, stirring occasionally. Add the green tomatoes and chicken stock and bring to a boil; reduce to a simmer and cook for about 15-20 minutes, until the tomatoes soften. Remove the bay leaves, add the basil, and puree in a blender or food processor in batches. Put soup back in the large pot, add lemon juice, tabasco, and salt to taste. Keep warm if serving hot, or let cool and refrigerate if serving cold.

To make the garnish....
Bring a medium pot of water to boil and drop the whole tomatoes in for 10-30 seconds. Remove and immediately submerge in ice water to cool. After a minute or so, remove the tomatoes from the ice water and peel off the skin. Dice the tomatoes (removing the seeds and juice) and reserve for the soup topping.

Meanwhile, heat a large skillet over medium heat with a little olive oil. Season the shrimps with garlic powder, paprika, salt and pepper and cook in the skillet. Remove from heat and chop into 1/2-inch pieces. Once soup is ready to be served, place mounds of the shrimp in the center of a bowl, ladle the soup around the shrimp, and sprinkle the tops with pancetta and tomatoes. Finally, drizzle a bit of the sour cream on top... serve and enjoy!

Monday, June 4, 2012

Raspberry Swirl Cheesecakes

Martha, you're the best. This is the second Martha Stewart mini cheesecake recipe I've tried, and this was just as good, if not better, than the last. I made these with the help of a few girlfriends this weekend to bring to a potluck. We made the mistake of halving the recipe because we thought: who could ever eat 36 mini cheesecakes? Well, um, we could have. And I wish we had at least made a full recipe. One of my friends said we should have actually doubled the recipe. It is possible that 72 mini cheesecakes woulda been overkill, but I'm really not so sure. These were incredible.

INGREDIENTS
1 1/2 cups graham cracker crumbs
3 tablespoons unsalted butter, melted
1 1/2 cups plus 5 tablespoons sugar
6-ounces  fresh raspberries
2 lbs. cream cheese, room temp
pinch of salt
1 1/2 teaspoon vanilla extract
4 large eggs, room temperature

Preheat oven to 325 degrees. Line standard muffin tins with liners.

In a medium bowl stir together the graham cracker crumbs, butter, and 3 tablespoons of sugar until combined. Press about 1 tablespoon of the mixture into the bottom of each muffin liner. Bake until set, about 5 minutes. Let cool.

Using a food processor or blender, puree the raspberries until smooth. Pass through a fine mesh strainer, extracting as much juice as possible; discard the seeds. Whisk in 2 tablespoons of sugar and set aside.

Using an electric mixer set to high speed beat the cream cheese until fluffy, scraping down the sides of the bowl as needed. On low, add the sugar in a steady stream. Add salt and vanilla and mix until combined. Add eggs, one at a time, beating until just incorporated after each.

Spoon about 3 tablespoons of filling over each crust and dollop 3 1/2-teaspoon drops of raspberry puree on top of each. Using a toothpick, swirl the sauce into the filling. Place each muffin tin in a high rimmed baking sheet and pour about 1/2-inch of hot water into the bottom of the pan (not in the cheesecakes, obviously). Bake for about 24-30 minutes. Carefully remove from water bath, transfer to a wire rack and cool. Refrigerate in tins, uncovered at least 4 hours. Serve and enjoy!

Sunday, June 3, 2012

Spinach, Bacon, & Fried Goat Cheese Salad


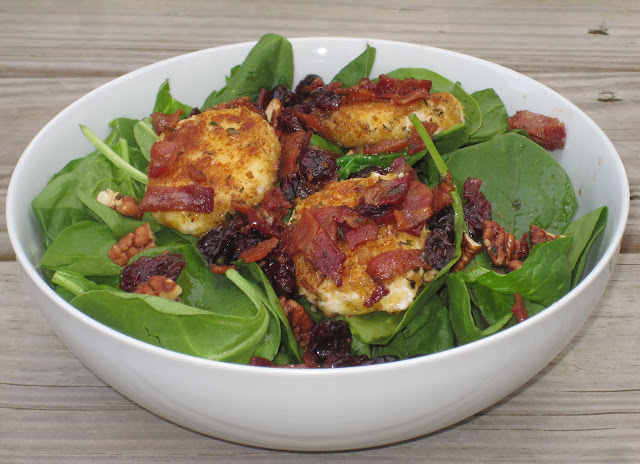
My favorite kind of salads are the ones filled with so much bacon, cheese, and fried things that you just know your heart woulda been better off if you'd just eaten a double cheeseburger... only half kidding. This is one of those salads that has quickly become a favorite of mine. It was so delicious and satisfying, although, when are bacon and fried goat cheese ever not satisfying? Ya gotta make this. Makes 2 main course salads.


INGREDIENTS
4 ounces baby spinach
1/4 cup candied pecans
5 pieces of fried bacon- keep the bacon grease for the dressing
1 clove garlic, minced
1 teaspoon fresh thyme leaves, minced
2 tablespoons red wine vinegar
1/4 cup dried cranberries

Fried Goat Cheese
3 ounces goat cheese
1/3 cup flour
1 egg, beaten
1/2 cup panko bread crumbs
1/4 teaspoon dried thyme
1/4 teaspoon garlic powder
pinch of salt

Equally divide the spinach, pecans, and bacon pieces between two bowls or plates and set aside. Next, make the fried goat cheese. To do this, take the goat cheese and cut into 1/3-inch slices using a knife just run under hot water (you should get about 6 slices). Place slices on a plate and refrigerate for a few minutes. Meanwhile, place the flour in a small bowl, the egg in another bowl, and combine the bread crumbs, thyme, garlic powder, and salt in another. Take each slice of cheese and first coat both sides in the flour, then the egg, then the bread crumbs. Fry each in a bit of olive oil until lightly browned on each side. They are delicate, to be careful. Place 3 pieces on each salad. 

Quickly wipe out the oil from frying the cheese and pour 4 tablespoons of bacon grease into the pan. If you do not have this much, substitute olive oil. Add the bacon pieces and cook until warmed. Add the garlic and cook, stirring, for about 20-30 seconds. Add the thyme and cook for 10 seconds. Pour in the red wine vinegar and cranberries and immediately take off the heat. Give a quick stir and pour on top of salads. Eat and enjoy (this is not a salad you want sitting around for a long time... eat right away!). 


Monday, May 21, 2012

Triple Chocolate Mousse Cake

I've been wanting to make this cake for a long time now- ever since I saw it featured in one of ATK's episodes last year. It was worth the wait! Not only is this cake beautiful, but its delicious. Each layer tastes amazing alone, and outstanding together. It looks like a lot of steps, but it came together pretty quickly!

INGREDIENTS
Bottom Layer
6 tablespoons unsalted butter
7 ounces bittersweet chocolate
3/4 teaspoon instant espresso powder
1 1/2 teaspoons vanilla
4 large eggs, separated
pinch table salt
1/3 cup packed light brown sugar

Middle Layer
2 tablespoons cocoa powder
5 tablespoons hot water
7 ounces bittersweet chocolate
1 1/2 cups cold heavy cream
1 tablespoon granulated sugar
1/8 teaspoon table salt

Top Layer
3/4 teaspoon powdered gelatin
1 tablespoon water
6 ounces white chocolate chips
1 1/2 cups cold heavy cream

Directions for the Bottom Layer. Preheat oven to 325 degrees and butter the bottom and sides of a 9 1/2 inch springform pan. Melt the butter, chocolate, and espresso powder in a double boiler, stirring occasionally until smooth. Remove from heat and cool about 5 minutes. Whisk in vanilla and egg yolks and set aside.

Using an electric mixer, beat the egg whites and salt on medium speed about 30 seconds, add half the brown sugar, beat to combine, add the rest of the sugar and beat at high speed until soft peaks form. Using a whisk, fold 1/3 of the egg whites into the chocolate mixture. Then, using a rubber spatula, fold in remaining egg whites until no white streaks remain. Transfer mixture into springform pan, smoothing top with spatula. Bake until cake has risen and center is just set and still soft (13-18 minutes). Let cool completely, about 1 hour. Do not remove cake from pan.

Directions for the Middle Layer. Once cake is cool, combine cocoa powder and hot water in small bowl and set aside. Melt chocolate in a double boiler, stirring until smooth. Remove and cool 2-5 minutes. Whisk the cocoa powder mixture into the melted chocolate until smooth.

Using an electric mixer, with a whisk attachment, whip the cream, sugar, and salt at medium speed for 30 seconds. Increase speed to high and whip until soft peaks form. Using a whisk, fold 1/3 of the whipped cream into the chocolate mixture, then using a spatula, fold in remaining whipped cream until no white streaks remain. Spoon mousse into springform pan over the cooled cake and gently tap pan on counter to remove any large air bubbles. Gently smooth top with spatula. Refrigerate cake at least 15 minutes while preparing the last layer.

Directions for the Top Layer. In a small bowl, sprinkle gelatin over water and let stand at least 5 minutes. Place white chocolate in a medium bowl. Bring 1/2 cup cream to simmer; take off heat and add gelatin and stir until fully dissolved. Pour hot cream mixture over white chocolate, whisking until chocolate is melted and smooth. Cool to room temperature (will only take 5-10 minutes).

Using an electric mixer with a whisk attachment, whip remaining cup of cream on medium speed for 30 seconds, then increase the speed to high and whip until soft peaks form. Using whisk, fold 1/3 of whipped cream into white chocolate mixture to lighten. Using rubber spatula, fold remaining whipped cream into chocolate mixture until no white streaks remain. Spoon on top of the middle layer, smoothing with a spatula. Return cake to refrigerator and chill until set- at least 2 1/2 hours.

To serve. Use a very sharp (non-serrated) knife that has just been run under hot water to cut each slice. Decorate with shaved or curled chocolate.

    Tuesday, May 15, 2012

    Moroccan Eggplant Bisque w/ Mint Yogurt

    About 10-days ago my favorite restaurant in Durham, NC, Magnolia Grill, announced they were closing their doors after 26 years. Luckily, both Ben and Karen (co-chefs) have released cookbooks over the years with some of their, and their customers', most favorite recipes; whereas my family will no longer be able to eat at MG, we'll be able to cook their recipes forever.

    Ben explains that this soup is the favorite of the waitstaff due to its complexity of flavors. He's right- its dynamite. It is the best soup I have ever made. And it has nothing to do with my cooking skills. THIS RECIPE IS PERFECTION. Warning: its a lot of ingredients, but its really really worth it. Serves 6-8 as a main course and freezes well.

    SOUP INGREDIENTS
    2 large eggplants (~2 pounds)
    1/2 cup olive oil
    2 large onions, chopped
    2 jalepenos, stemmed, seeded, diced
    8 cloves garlic, peeled and left whole
    2 tablespoons Moroccan spice blend (see recipe below)
    generous pinch of saffron
    1 cinnamon stick
    1 bay leaf
    2 cups canned tomatoes, seeded & chopped, juices strained & reserved
    6 cups chicken stock
    zest of 1 lemon
    1/4 cup lemon juice
    1/4 cup chopped cilantro

    GARNISH INGREDIENTS
    1 pound boneless, skinless chicken thighs
    2 tablespoons Moroccan spice blend
    olive oil
    6 ounces plain yogurt
    1 tablespoon slivered fresh mint
    1/3 cup cilantro leaves

    MOROCCAN SPICE BLEND
    2 tablespoons paprika
    1/2 teaspoon cayenne pepper
    1 1/2 teaspoon ground cumin
    1/2 teaspoon anise seed
    1 teaspoon ground cloves
    4 inches of a cinnamon stick

    Making the Moroccan Spice Blend....
    Pour the ingredients into a spice grinder and grinding until all a fine powder. Cover tightly and reserve.

    Making the Bisque...
    Preheat the oven to 350 degrees, prick the eggplants all over with a fork, and roast the eggplants whole, for about 35-45 minutes, or until soft and partially collapsed. Remove from oven, cut in half, scrape some of the seeds out and remove the skin. Reserve the roasted flesh.

    Heat the olive oil in a large pot on medium heat. Add the onions, and cook, stirring occasionally, until softened. Add the garlic cloves, jalepenos, Moroccan spice, saffron, bay leaf, and cinnamon stick. Cook for about 2 minutes, stirring, then add the tomatoes, with their juices, the roasted eggplant, and the chicken stock. Bring to a simmer and cook for about 30 minutes. remove the cinnamon stick and bay leaf and puree the soup in batches in the food processor (or with an immersion blender). Add the lemon zest, lemon juice, cilantro and salt and pepper to taste.

    Make the Soup Garnish...
    While the soup is simmering, rub the chicken thighs with the spice blend and olive oil to coat. Season with salt and bake on a rack in the oven for 15 minutes at 350 degrees. Cool slightly and cut or shred into 1/2-inch chunks. Reserve.

    Next, combine the yogurt and slivered mint and set aside/refrigerate if not using immediately.

    Assembly...
    Make sure the soup is hot and adjust the seasonings as needed (if its too thick, add more chicken broth; if it doesn't have enough flavor, try more salt; add more lemon juice if you want more of an acidic kick). Divide the chicken between 6 bowls (or reserve some of the chicken if you aren't serving that many people), and ladle hot soup into the bowls, with a dollop of the mint yogurt on top. Sprinkle with extra cilantro and serve. I did not even make it to the table when I ate it- I stood over the counter and inhaled it.

    Tuesday, May 8, 2012

    Broccoli Cheese Soup

    I'm an idea stealer. I overheard my friends talking about a broccoli cheese soup they were planning on making some time this week and it sounded so good that I ran to the grocery store and made it that evening. Its embarrassing, really, the way that food runs my life. But this soup. THIS SOUP. Its amazing. I topped it with homemade garlic croutons and fried pancetta. Drool.

    INGREDIENTS
    2 tablespoons butter
    2 pounds broccoli, florets and stems
    1 onion, chopped
    2 garlic cloves, minced
    1 1/2 teaspoons dry mustard
    2 pinches of cayenne
    3 cups water
    1/4 teaspoon baking soda
    2 cups chicken broth
    2 cups fresh spinach
    3 ounces sharp cheddar cheese
    1 1/2 ounces parmesan
    salt & pepper

    CROUTONS
    2 tablespoons butter
    2 tablespoons olive oil
    1 cup of 1-inch cubed ciabatta or french bread
    1/4 teaspoon garlic powder

    Chop the broccoli florets into 1-inch pieces, and trim and peel the stems and slice them in 1/4-inch slices. Melt the butter in a large soup pot over medium-high heat and add the chopped broccoli, onion, garlic, mustard, cayenne and about 1 teaspoon of salt. Cook, stirring frequently for about 6 minutes. Add 1 cup of water and the baking soda, cover and reduce the heat and let simmer for about 20 minutes- stirring once halfway through the cooking time. You'll know that the veggies are cooked when they are very soft.

    Once finished, add the remaining 2 cups of water and 2 cups of chicken broth and return the heat to medium-high heat. When mixture begins to simmer again, add the spinach and cook for about 1 minute. Meanwhile, grate the cheeses and add them to the soup and process using a hand blender. Or, process in a stand blender in batches. Return to pot, taste for salt & pepper, and serve in bowls.

    To make the croutons: melt butter and olive oil in a pan and add the garlic powder. Add the cubed bread and toss to coat. Spread onto a baking sheet and sprinkle with kosher salt. Bake at 350 degrees for about 10-15 minutes, tossing the cubes halfway in between.

    Monday, May 7, 2012

    Chocolate Brigadeiros

    Brigadeiros are sweet Brazilian truffles that are made from only 3 ingredients then rolled in sprinkles before eating. They are really tasty, incredibly easy to make, and quite cute. They'd be great as a gift for a co-worker or friend, to bring to a party, or even for kids to make and eat. This recipe adds significantly more chocolate than traditional recipes, but you're probably not surprised that I believe that more is better when it comes to chocolate.

    INGREDIENTS
    2 tablespoons butter
    1/4 cup unsweetened cocoa
    1 (14 oz) can sweetened condensed milk

    Melt the butter in a medium saucepan over medium heat and slowly add the cocoa, stirring constantly until incorporated. Add the can of sweetened condensed milk and stir with a spatula or wooden spoon, basically non-stop for about 20-30 minutes, or until thickened. You will know that its done when you can use a spatula to create a clean 2-inch clean line at the bottom of the pan for a few seconds before the chocolate mixture fills it in. Make sure to keep stirring and scraping the corners of the pan so the mixture doesn't burn.

    When thickened pour into a greased 8x8 glass dish and refrigerate for 30-45 minutes.

    Using a tablespoon, scoop the chocolate mixture, roll into balls (you may want to grease your hands) and roll in sprinkles or toppings of your choice. Serve immediately or refrigerate. Makes ~2 dozen truffles.

    Thursday, May 3, 2012

    Best Blondies in the World


    The first time I had these blondies was a few weeks ago at a friend's house and they served them for dessert, warm out of the oven with a scoop of vanilla ice cream on top. I was in heaven. They were rich in flavor and buttery and I knew I needed to make them myself. Fast forward 2 weeks: a girlfriend of mine was over and we made the same blondies, exactly as our friend had, and watched an awesomely terrible, horrible, no good, very bad Hallmark original movie. It was a perfect night. This is now my go-to blondie recipe. Out with the old, in with the new!

    INGREDIENTS
    1 cup (4 oz) pecans
    1 1/2 cups all-purpose flour
    1 teaspoon baking powder
    1/2 teaspoon salt
    12 tablespoons unsalted butter, melted and browned and cooled slightly
    1 1/2 cups dark brown sugar, packed
    2 large eggs, beaten
    4 teaspoons vanilla extract
    3 oz white chocolate chips
    3 oz semi-sweet/bittersweet chocolate chips

    Preheat oven to 350 degrees. Spread the nuts on a baking sheet and bake until golden brown (~10 minutes, give or take). Cool nuts and chop coarsely. Set aside.

    Meanwhile, whisk together the flour, baking powder, and salt, in a medium bowl and set aside.

    In a large bowl whisk together the butter, brown sugar, eggs, and vanilla and beat until incorporated. Using a rubber spatula, fold the dry ingredients into the wet ingredients; do not overmix. Fold in the chocolate and nuts and pour batter into an aluminum foil-line (and lightly greased) 9x13 pan. Smooth the top with a spatula and bake for about 20-25 minutes. Do not overbake. These are so delicious and buttery, and you want them gooey. Remove from oven and let cool slightly. Cut into squares are eat!

    Sunday, April 29, 2012

    Pomegranate & Mint Margaritas!

    As you can see, this photo was taken by JAV. Perfection.

    I recently bought and potted two mint plants on my back porch and they are growing like weeds. I decided to use the leaves in a cocktail a few weekends ago when a few of my girlfriends from college were visiting.

    And I've made this drink probably 4 times since then, each time it is as good as the first. This is one of the best (if not the best) cocktails I've ever made. You must make it immediately. Right away. Its 5 o'clock somewhere, right? Makes 2 margaritas.

    INGREDIENTS
    3 ounces tequila
    1 ounce triple sec
    1 ounce1 pomegranate juice
    1 1/2 limes, juiced
    8-10 fresh mint leaves

    Pour tequila, triple sec, pomegranate juice, and limes juice in a cocktail shaker. Take the mint leaves, rub together and tear into pieces (to release the extract) and drop in the shaker. Fill with ice and shake vigorously for 30 seconds, or until ice-cold. Pour into 2 martini glasses and drink up!


    Awesome Apple Pancakes

    Until recently, breakfast has been my least favorite meal of the day, but for the past few months I've been into making breakfast foods. And these apple pancakes were delicious! Like very very good. Maybe even as good as my favorite banana bread pancakes from a few months ago. They're quite easy to make and have wonderful flavor. I also made yummy breakfast turkey sausage patties to go with the pancakes... the super-easy recipe for the sausage is at the bottom of this post. Happy weekend eating!


    INGREDIENTS
    2  eggs, well beaten
    1 1/2 cups buttermilk
    2 tsp. vanilla extract
    1 cup white all-purpose flour
    1 cup whole wheat flour
    1 teaspoon baking powder
    1/2 teaspoon salt
    2 tbs. sugar
    2 tbs. brown sugar
    1/2 teaspoon ground cinnamon
    2-3 green apples, peeled & grated
    1/4 cup apple cider/juice
    2 tbs. butter, melted


    Whisk together the eggs, buttermilk, and vanilla in a large bowl. In a separate bowl whisk together both flours, baking powder, salt, sugars, and cinnamon. Slowly stir into the wet ingredients and add the grated apples and stir just until combined. Pour the apple cider and melted butter into the batter and stir to combine.  If the mixture seems to thick, you may thin it out a bit with more apple juice... but don't thin it too much- you want these bad boys to be thick.

    Heat a griddle or pans and make pancakes with about 1/3 cup of batter. Spread them out a bit on the pan, or else they'll be mountains. Cook the pancakes until perfectly golden brown on each side. Serve with butter and maple syrup on top. Or make your own sweetened apple syrup and serve on top (boil apple cider/juice with brown sugar and a bit of cinnamon until it reduces and thickens a bit). 


    Homemade Turkey Breakfast Sausage Patties
    1 lb. ground turkey (85/93% lean)
    1 teaspoon salt
    1 1/2 teaspoon dried rubbed sage
    3/4 teaspoon pepper
    1/2 teaspoon ground ginger
    1/2 teaspoon cayenne
    2 teaspoon maple syrup
    1/2 teaspoon cumin

    Mix ground turkey and spices together with your hands. Let sit in refrigerator, covered, over night. Shape into thin patties (they will thicken as you cook them) and fry in a skillet until browned on each side. Makes ~8 2-inch patties. 

    Friday, April 27, 2012

    Cold Brew Iced Coffee

    Coffee has taken over my life. I dream about it approximately 2x/week (pathetic, yet truthful). I can't wait to go to sleep at night and wake up in the morning so that I can pour myself a big strong cup. I don't even mind that some days I drink so much that my heart races and I am convinced that I'm having a panic attack. Its worth it.

    Now that the temperature is heating up, its iced coffee time! But hot-brewed iced coffee is often too acidic and/or tastes burnt, or old, or just gross. So I bought myself a cold-brew Bodum, which is completely unnecessary to making cold brew coffee, but definitely makes the process a bit easier. I highly recommend it.

    INGREDIENTS
    3-4 oz. coffee beans
    5 cups filtered water
    2 large containers (pitcher, large coffee press, etc.)
    1 coffee filter
    1 fine mesh strainer or colander
    creamer, simple syrup, sweetened condensed milk (whatever you like in your coffee)

    Grind the coffee beans (medium-coarse grind) and place in the bottom of one of the large bowls, pitchers, or containers. Pour the filtered water on top and stir to combine and soak all coffee grounds into the water. Cover tightly and keep on the kitchen counter (not the fridge) for 12 hours. Depending on how strong you like your coffee, you may want to add more or less coffee grounds or let it sit for more or less than 12 hours. Once it has finished "brewing," you're ready to strain the coffee grounds. This is when the Bodum press is handy- you can just press the grinds down to the bottom and pour straight from the container. Otherwise, set up a coffee filter over a fine mesh strainer and place over your other large bowl/pitcher/container. Slowly pour the coffee and let the filter/strainer gather all the coffee grounds. There you have it! Will stay good in fridge for at least 1 week, but it probably won't last that long.

    Pour into a glass over ice and add milk and sweetener if you so desire (remember, though, that granulated sugar won't dissolve easily in iced drinks, so you may want to make a simple syrup or, if you're really bold, sweeten your drink with sweeten condensed milk).

    Monday, April 23, 2012

    Liberty Square Cookies

    I found this recipe on The Girl Who Ate Everything, and she calls them Liberty Square cookies because that's the address where she lived when she created the recipe. She also calls them "Date Me" cookies because, apparently, guys come running when you make these bad boys. I'll keep you posted on that one.


    When I considered making this recipe I didn't plan on blogging about them. I thought for sure that I had already posted some sort of butterscotch chip cookie recipe; but when I searched my archives tonight, I realized that I had not (GASP), which is weird, because I love butterscotch. If you don't, thats okay- to each his own... but don't use this recipe and replace the butterscotch with more chocolate... just make a different chocolate chip cookies recipe. In my opinion, these are wonderful BECAUSE of the butterscotch. Chewy, sweet, & a bit salty.

    INGREDIENTS
    11 tablespoons of butter, softened
    2/3 cup brown sugar, packed
    1/2 cup granulated sugar
    1 egg, room temperature
    1 teaspoon vanilla extract
    2 cups all-purpose flour
    1/2 teaspoon kosher salt
    1/2 teaspoon baking soda
    4 ounces butterscotch chips
    4 ounces chocolate chips

    Using an electric mixer, beat the butter and both sugars for 2 minutes. Add the egg and vanilla and beat until fluffy (another 1-2 minutes). Slowly add the dry ingredients, beating slowly until incorporated. Add the butterscotch and chocolate chips and stir to combine. Roll cookies into heaping tablespoon balls and place on a parchment lined cookie sheet. Bake for ~10 minutes at 350 degrees. Yield 24 cookies.

    Sunday, April 22, 2012

    Tex-Mex Chicken "Gumbo"

    This is the first recipe I tried from my new slow-cooker cookbook "America's Test Kitchen: Slow-Cooker Revolution." The recipe in the book calls it a stew, but it reminded me a lot of gumbo with a mexican twist. I served it over a scoop of rice and it was really flavorful, healthy, and filling! Makes enough to serve 8 as a main-course.

    INGREDIENTS
    2 onions, minced
    2 jalepenos, seeded & minced
    6 garlic cloves, minced
    1 tablespoon tomato paste
    1 tablespoon vegetable oil
    1 tablespoon chile powder
    4 cups chicken broth
    1 can diced tomatoes, drained
    1/4 cup minute tapioca
    1 tbs. brown sugar
    3 lbs. boneless skinless chicken breasts
    2 cups frozen corn
    1 can black beans, rinsed & drained
    2+ minced chipotles in adobo
    1/4 cup chopped cilantro
    salt and pepper


    Combine the onion, jalepeno, garlic, tomato paste, vegetable oil, and chile powder in a glass bowl and microwave for 5 minutes, stirring every once in a while, until onions have softened. Pour into slow cooker. Add the chicken broth, diced tomatoes, tapioca, and brown sugar and stir together. Nestle the chicken breasts in the broth mixture and turn heat to low and cook for about 3 hours. Test chicken to see if cooked through (could take anywhere from 3-5 hours). Once cooked, remove the chicken from the cooker and shred with 2 forks. Meanwhile, add the corn and black beans and let cook on high heat for 10 minutes. Add the chicken back into the slow cooker and add the chipotles, tasting for heat (I added 2 chipotle peppers minced plus about a tablespoon or more of adobo sauce). Add salt and pepper and cilantro and serve over a scoop of rice.

    Tuesday, April 10, 2012

    Lemon "Cracked" Sugar Cookies

    Mmm-mmm-mmm. These cookies are delicious... melt-in-your-mouth... perfectly bright and refreshing. Absolutely a cookie that must be made in your kitchen as soon as possible. The lemon flavor is subtle but present and these cookies continue to taste delicious for days. Recipe adapted, barely, from Lets Dish.

    INGREDIENTS
    1 stick of butter, softened
    1 cup granulated sugar
    3/4 teaspoon vanilla extract
    1 egg
    1 tablespoon lemon zest
    2 tablespoons fresh lemon juice
    1 1/2 cups flour
    1/4 teaspoon salt
    1/4 teaspoon baking powder
    1/4 teaspoon baking soda
    1/3 cup powdered sugar

    Preheat the oven to 350 degrees and grease 2 cookie sheets.

    Using an electric mixer beat together the butter and sugar until light and fluffy, scraping down the sides of the bowl as needed (a good 3-5 minutes). Add the vanilla, egg, lemon zest, and lemon juice and beat another minute. Sift together the flour, salt, baking powder, and baking soda and slowly add it to the wet ingredients, and stir just until combined.

    Pour the powdered sugar in a shallow bowl. Scoop heaping teaspoons of cookie dough and roll into balls, rolling in the powdered sugar before placing on the cookie sheet. Bake for 8-10 minutes and remove from oven when cookies just begin to crack. Let cool for 3 minutes and remove with a spatula and let the cookies finish cooling on a wire rack. Makes ~30 cookies.

    Thursday, April 5, 2012

    Chocolate-Cherry-Oatmeal Cookies


    The recipe that I based these cookies off of call them "heart smart" because of the bittersweet chocolate (high antioxidants help lower blood pressure), the cherries (also high in antioxidants), and the oatmeal (helps lower cholesterol). This recipe also uses whole wheat flour and only 6 tablespoons of butter, which is very little for most cookie recipes. So I thought, what-the-heck, I'll give 'em a whirl. And I'm so glad that I did. Not only will you feel good about eating these because they are a bit healthier than most cookies, they are absolutely-totally-delicious. Adapted from Cooking Light, January 2010. Photo by Jason Volpe. I've said it before, I'll say it again: he's the best.

    INGREDIENTS
    6 tablespoons butter, room temperature
    3/4 cup brown sugar
    1 large egg, room temperature, lightly beaten
    1 1/2 teaspoon vanilla extract
    1/3 cup whole wheat flour
    1/3 cup all-purpose flour
    1 1/2 cups old fashioned oats
    1/4 teaspoon cinnamon
    3/4 teaspoon baking soda
    1/2 teaspoon salt
    1 cup chopped dried cherries
    1 cup bittersweet chocolate chips

    Preheat oven to 350 degrees and line 2 baking sheets with parchment paper. Set aside.

    Using an electric mixer cream the butter and brown sugar together for about 4-5 minutes, scraping the sides halfway through. Add the egg and vanilla and beat another minute. In a separate bowl mix together both flours, oatmeal, cinnamon, baking soda, and salt. Slowly add the dry ingredients to the wet ingredients and beat just until combined. Add the cherries and chocolate chips and stir to combine.

    Roll into heaping tablespoon-sized balls and place on prepared cookie sheet. Bake for 8-10 minutes, or just until edges are slightly browned and center is still gooey. This will result in a perfectly chewy cookie. Remove from oven, cool on racks, and serve with a glass of milk!

    Wednesday, April 4, 2012

    Spicy Turkey Meatballs and Spaghetti


    Everyone knows that I love Italian food. But, as I have mentioned in the past, I don't often cook traditional Italian foods because so many of my friends are pure-blooded Italians and I leave it to them. However, I was watching Barefoot Contessa this past weekend and watched Ina make these spicy turkey (and sausage and prosciutto, drool) meatballs and I knew that I'd be making them ASAP. Ina served her meatballs on top of spaghetti and jarred sauce, but I was warned by multiple friends (near and far) that this was sacrilegious and was told to not make this same mistake.

    So, I made Ina's meatballs and my first ever all-day-sauce, adapted from Cook's Illustrated. Everything about this dish was wonderful. The sauce was rich and hearty, and naturally sweet with a spicy kick. The meatballs are denser than traditional meatballs (after all, they are made from turkey, not beef), and they have the most amazing flavor (thank you, sausage... thank you, prosciutto). This was an absolute hit. I would not change a thing about it. Don't be scared by the number of ingredients... it really is an easy recipe. This recipe will make enough sauce & meatballs for 2 lbs. of pasta and will feed 8 very hungry people.

    MEATBALL INGREDIENTS
    3 cups 1-inch bread cubes from a round rustic bread (whatever that means), crust removed
    2/3 cup whole milk
    2 lbs. ground turkey (85%-92% lean)
    1/2 lb. italian sausage, castings removed
    4 ounces (1/4 lb.) thinly sliced then diced prosciutto
    1 cup freshly grated (in food processor) parmesan 
    1/2 cup fresh parsley, minced
    1 teaspoon dried oregano
    1 1/2 teaspoon crushed red pepper flakes
    2 1/2 teaspoon salt
    ground black pepper
    3 tablespoons olive oil, plus extra for brushing meatballs
    2 extra-large eggs, lightly beaten

    Put the bread cubes in the food processor and grind until medium-sized bread crumbs. Pour into a small bowl and add the milk, stirring to combine. Set aside for 5 minutes. 

    In a large bowl, using your hands, carefully combine the milk-soaked bread, ground turkey, sausage, prosciutto, parmesan, parsley, oregano, red pepper flakes, salt, and pepper. Add the olive oil and egg and combine carefully using a fork. Roll into 2-inch balls and place on a parchment paper lined baking sheet. Brush tops of meatballs with a bit of olive oil and bake at 400 degrees for 30-40 minutes, or until lightly browned on top and cooked through. Remove from oven and place in pot of sauce.

    TOMATO SAUCE INGREDIENTS
    2 tablespoons olive oil
    1 large onion, grated
    4 garlic cloves, minced
    1/2 teaspoon red pepper flakes
    3/4 teaspoon dried oregano
    2 (28 oz.) cans crushed tomatoes
    3 cups tomato juice
    1 cup chicken broth
    1/4 cup dry white wine
    1 teaspoon salt
    1/2 teaspoon ground black pepper
    2 tablespoons parmesan, grated (in food processor) 
    1 teaspoon dried basil

    Heat the olive oil in a large pot on medium heat. Add the grated onion and cook, stirring occasionally, for 6-8 minutes. Add the garlic, red pepper flakes, and oregano and cook, stirring, for about 30 seconds. Add the crushed tomatoes, tomato juice, chicken broth, and white wine, and bring to a simmer. Turn heat down to low and cook until thickened (about 20 minutes). Add the salt, pepper, parmesan, and dried basil and stir to combine. Continue to simmer for a few hours- if the sauce gets too thick, you can thin it out by adding more tomato juice or chicken broth. Add the meatballs and continue cooking, stirring occasionally, for a few more hours to let the meatballs braise and flavor the sauce. Taste for salt, pepper, sugar, red pepper flakes, etc. Once finished, serve over spaghetti and enjoy! 

    Tuesday, April 3, 2012

    Arugula Salad with Shaved Fennel, Grapefruit, & Parmesan


    This is my dad's favorite salad and he made it for me last month when I was home in North Carolina (along with a huge pan of lasagna bolognese... he knows me so well). It was such a nice spring salad that I thought I'd make it again this week. I think its a winner due to the seemingly unusual but wonderful flavor combinations of all the ingredients (the subtle licorice-ness of the fennel, the bitterness of the grapefruit, the saltiness of the parmesan, and the spiciness of arugula). Its very easy to make and was enjoyed by all. Photo by Jason A. Volpe.

    INGREDIENTS
    5 ounces arugula
    1/3 cup shaved fennel bulb
    1 juicy ripe grapefruit, sliced into segments
    2-3 oz. good parmesan, shaved with a vegetable peeler
    2 tablespoons pine nuts, toasted

    Put all ingredients in a large bowl and toss with salad dressing (below).

    Vinaigrette
    1 clove garlic, minced
    1 teaspoon dijon mustard
    1 teaspoon lemon juice
    1 teaspoon grapefruit juice
    1 teaspoon red wine vinegar
    3 tablespoons olive oil
    salt & pepper

    Put all above ingredients in a jar and shake to combine/emulsify. Taste and season appropriately. Pour over salad and serve.

    Tuesday, March 13, 2012

    Southwestern Quinoa Salad

    This salad was a delicious and refreshing treat, especially now that spring is near and its getting warmer outside. I ate this as a one-bowl dinner, but it could be a lovely side dish brought to a potluck or cookout. Its filling and incredibly healthy. Yum yum yum.
    Adapted from www.letsdishrecipes.com.

    INGREDIENTS
    2 cups cooked quinoa
    1 can black beans, rinsed & drained
    1 cup canned corn, drained
    3/4 cup red bell pepper, chopped
    1 avocado, chopped
    1 small jalepeno, seeded & chopped
    1/4 cup red onion, thinly sliced
    1/3 cup cilantro, chopped
    1 garlic clove, finely chopped

    Dressing Ingredients
    3 tablespoons red wine vinegar
    3 tablespoons olive oil
    1/2 teaspoon salt
    1/4 teaspoon pepper
    1/2 teaspoon red pepper flakes
    1/2 teaspoon cumin
    1 teaspoon chili powder
    1 teaspoon oregano
    1 lime, juiced


    Add all the salad ingredients to a large bowl and stir/fold to combine using a spatula, so as to not mush the avocado. Mix together the dressing ingredients in a jar and shake to combine. Pour over salad and stir to incorporate. Refrigerate for 2+ hours before serving.

    Tuesday, March 6, 2012

    Chocolate & Bailey's Truffle Pudding


    I have wonderful friends. They are kind and hilarious and always have my back. My friend Stephanie (Stephanie's Blog) is one such friend. She is always helping me dream up ways in which we can quit our day jobs and open up a bakery and spend our days cooking, eating, and feeding people. Yesterday, she sent me a recipe that had my name written all over it, knowing that if I happened to overlook it, I'd be devastated. Within 2 minutes, my shoes were on, keys in hand, and I was walking running out the door to the grocery store. Within 20 minutes, I was back home and cooking. I'm no psychologist (...), but I think I have a problem.

    The original recipe described this as a no-bake cake that you slice. Well, if thats what I was going for, my attempt was disastrous. It was impossible to slice, did not hold shape, and had to be scooped into bowls. But then, after my first bite, I realized that sometimes when recipes don't work out the way you intended they actually turn out better than you could have ever imagined. This is a WINNER. Elegant, smooth, rich, flavorful, silk. Perfection. Recipe from How Sweet It Is.

    PUDDING INGREDIENTS
    15 ounces milk chocolate
    12 ounces heavy cream
    4 ounces (1/2 cup) Bailey's Irish Cream

    Heat the cream and Bailey's in a medium saucepan over medium heat. Do not boil. Meanwhile, melt the chocolate in a double boiler or in the microwave, stirring every 15 seconds until just melted and smooth. Once the cream is heated, remove from heat and pour in the chocolate. Whisk until mixture is totally incorporated and smooth- this could take 3-5 minutes. Pour into a bowl and chill in the refrigerator for 6+ hours.

    Once ready to serve, spoon into ramekins, wine glasses, or martini glasses with a dollop of Bailey's whipped cream on top!

    BAILEY'S WHIPPED CREAM
    1 cup heavy whipping cream
    3 tablespoons Bailey's Irish Cream
    2 teaspoons sugar

    Using an electric mixer beat together the cream and Bailey's. Once thickened, slowly add the sugar and continue beating until finished.

    Sunday, March 4, 2012

    Sausage Egg & Cheese "Bodega" Sandwich

    Confession: I have this terrible, horrible, no good, very bad habit of prematurely turning my nose up at foods like this... I'm foolish in the worst way possible. Before even tasting certain foods, I've decided that they're too simple, or have too many processed ingredients, or whatever soap box I'm on that day. Its honestly terrible... I'm trying to get better, because I am wrong 99.99% of the time. Dead wrong. Hence my first experience with a sausage, egg, & cheese breakfast sandwich at a bodega in NYC. I was on my way to a museum one morning and a friend thought we should get coffee and split a sandwich from his corner bodega. Trying to be polite I said, "sure!'... but was thinking, "oh gross. a bodega egg sandwich? i'll probably take one bite and let him finish the rest."

    Time stopped when I tasted that sandwich. And I've thought about it many times since. Lucky me that I stumbled upon a recipe for such a sandwich last week... even more lucky: I'm going to NYC in less than 2 weeks and am assured that the best bodega breakfast sandwich is actually on the corner of a different friend's block.

    INGREDIENTS
    1 english muffin
    1 teaspoon butter
    1 egg, plus 1 egg white
    1 1/2 teaspoons water
    1 slice american cheese
    1 patty breakfast sausage (I used turkey)
    salt & pepper

    Cook the breakfast sausage until cooked through (if you buy precooked sausage then just warm it up). Keep warm.

    Meanwhile, beat the egg and water together in a small bowl. Add salt and pepper and stir. Heat a small pan on medium heat and melt the butter. Pour the eggs into the pan and swirl the pan to coat the whole bottom in a thin, even layer. Place the cheese in the middle of the egg and cook for about 1 1/2 minutes, or until cooked. Using a spatula fold the egg over the cheese like the fold of an envelope... continue to fold sides of the egg on top of the cheese, working clockwise (all together 4 folds). Cook for another 30 seconds.

    Place on half of a toasted english muffin and top with the sausage and other half of the muffin (or one of those thin bagels would be good, too). Serve and enjoy!