Search This Blog

Tuesday, September 4, 2012

Late Summer Cheese Plate


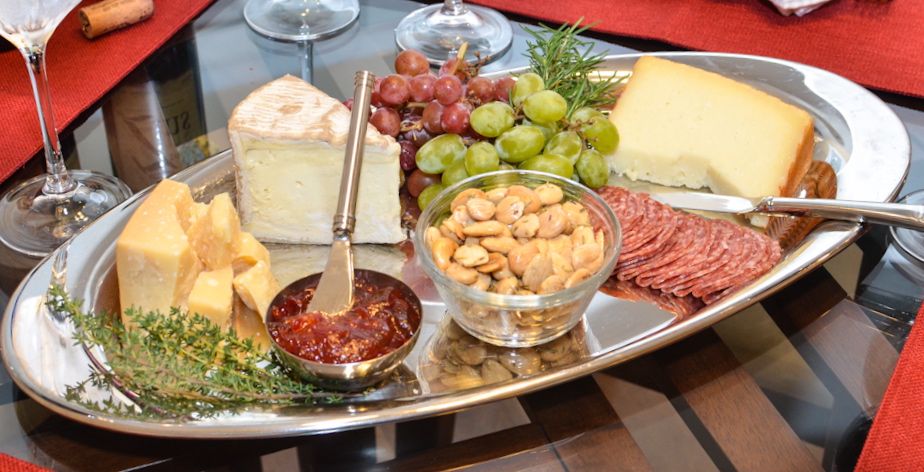
I don't usually post things like this, since I didn't actually make any of the edible items in this picture... But I've been feeling guilty about my lapse in blogging and am probably over-compensating by posting anything I can deem even adequately appropriate for a food blog. Also, whenever I can get Jason (my favorite photographer) to take pictures of my food, I jump at the opportunity. And this picture is just too pretty to not post.

The fun thing about making a cheese plate/board is that you can add whatever you want to it and take out whatever you don't like, you can change it based on the season, or pick items based on what wine you'll be drinking. In general, when I'm making a cheese plate, I try to find a few different types of cheese (1 soft, 1 hard, 1 semi-hard), one kind of fruit, one kind of meat, one kind of finger food, and one kind of dip or relish. Below are some of my favorite potential combinations.

CHEESE PLATE INGREDIENTS
1 Soft Cheese
     - Triple Cream Brie
     - Burrata
     - Boursin
     - Goat cheese
1 Hard Cheese
     - Parmesan
     - Asiago
     - Romano
1 Semi-Hard Cheese
     - Cheddar
     - Manchego
     - Roquefort/Stilton
     - Edam
1 Meat/Charcuterie
     - Salami
     - Prosciutto
     - Soppressata
1 Fruit
     - Grapes
     - Sliced pear
     - Sliced apple
     - Figs
1 Finger Food
     - Marcona Almonds
     - Mixed nuts
     - Olives
1 Relish/Spread
     - Pepper relish
     - Pesto
     - Honey

Once you have bought and prepared all of your ingredients, place them on a large plate and decorate with fresh herbs or greens. Then... devour it!

Monday, September 3, 2012

Coconut Layer Cake


It has been over 6 weeks since my last blog post. I'm embarrassed. The truth is that I've actually been working on my dissertation proposal and internship applications (you can't stay in graduate school forever, apparently) and they've taken up a lot of my time and energy. Whereas I don't think this excuses my lack of cooking and posting, I guess it is an acceptable explanation. But, this long holiday weekend was a welcomed treat and I was able to spend a lot of time in my kitchen.

My first task was this coconut cake. And as you probably know, I love baking cakes. It is time consuming, but, like bread-making, the end result is so rewarding after investing that much time, attention, and care. Not only was the finished product absolutely the best coconut cake I've ever had, but it looks stunning when sliced (thanks to Jason Volpe's photography). It was a crowd pleaser and a perfect end to a wonderful dinner. You should make this before summer is over! Recipe adapted slightly from Cook's Illustrated.

CAKE INGREDIENTS
1 large egg
5 large egg whites
3/4 cup coconut cream (not milk)
1/4 cup water
1 teaspoon vanilla extract
1 teaspoon coconut extract
2 1/4 cups cake flour (9 ounces)
1 cup granulated sugar
1 tablespoon baking powder
3/4 teaspoon table salt
12 tablespoons unsalted butter (cut into 12 pieces, softened, but still cool)
2 cups packed sweetened shredded coconut

BUTTERCREAM INGREDIENTS
5 large egg whites
1 cup granulated sugar
pinch of table salt
3 1/2 sticks unsalted butter, cut into about 20 piece, softened, but still cool
1/3 cup coconut cream
1 teaspoon coconut extract
1 teaspoon vanilla extract

Making the cake...
Preheat oven to 325 degrees and adjust oven rack to lower middle-position. Grease 2 8-inch round cake pans with shortening and dust with flour.

In a large measuring cup, beat egg whites, whole egg, coconut cream, water, vanilla, and coconut extract and beat with a fork until thoroughly combined.

In the bowl of a standing mixer, combine the flour, sugar, and salt and mix on lowest speed with the paddle attachment for about 30 seconds. While mixer is running, add the butter, 1 piece at a time then beat until mixture resembles coarse meal, with butter bits no larger than small peas (2-2 1/2 minutes).

With mixer still running, add 1 cup of the reserved liquid, increase speed to medium-high and beat until light and fluffy, about 45 seconds. While mixer is still running, add remaining 1 cup of liquid in a stead stream. Scrape down the bowl and beat to combine. Divide batter between the two cake pans and level with a spatula. Bake until cakes begin to pull away from sides of pans, and toothpick inserted comes out clean (about 25-30 minutes). Cool pans on wire racks about 10 minutes, then invert cakes onto racks to cool to room temperature.

While oven is still on, spread the coconut on a rimmed baking sheet and toast for about 10-20 minutes, stirring every few minutes so that the coconut browns evenly. Cool to room temperature and set aside for the cake assembly.

Making the buttercream icing...
Combine egg whites, sugar, and salt in the bowl of a standing mixer; set bowl over saucepan containing 1 1/2 inches of barely simmering water. Whisk constantly until mixture is opaque and warm to the touch (~120 degrees), about 2 minutes.

Transfer bowl to mixer and beat egg whites on high speed with whisk attachment until barely warm (~80 degrees) and whites and glossy & sticky, about 7 minutes. Reduce speed to medium-high and beat in butter, 1 piece at a time. Beat in coconut cream, and coconut & vanilla extracts. Stop mixer, scrape down bowl, and continue to beat until well combined.

Assembling the cake...
With a long serrated knife, cut both cakes in half horizontally, so you have 4 thin layers of cake in total.

Center one layer of cake on a cake stand (you can steady the layer by putting a dab of icing on the bottom of the stand before placing the first layer on top). Spread icing on the top of the first layer and spread with a knife or spatula (the layer of icing should be about ~1/4 inch thick). Repeat with remaining layers. Once you place the top layer on, spread the remaining icing on the top and sides of the cake. Take the toasted coconut and sprinkle on top and press into the sides. Cut slices, serve, and enjoy! Cake can be stored in the fridge if you want, but the cake is best served room temperature (or slightly cool), so take it out hours before serving.

**** If you want to make this ahead of time: bake the cakes the day before, let cool completely, wrap in plastic wrap and store in the fridge overnight. Ice and assemble the following day.
Thursday, July 19, 2012

Parmesan Chicken


This is an outstanding, flavorful, and simple chicken recipe. I have no idea why it took me so long to make it, but I'm very glad I finally did (I made it for the first time 4 weeks ago and have made it 3 times since then.. its that good). It is an Ina Garten recipe from her cookbook Barefoot Contessa: Family Style and I have adapted it slightly. Serves 4.

INGREDIENTS
4 (~8oz) boneless skinless chicken breasts
1 cup flour
1 teaspoon kosher salt
1/2 teaspoon pepper
2 large eggs
1 tablespoon water
1 cup seasoned breadcrumbs
1/2 cup freshly grated/ground parmesan (or more if you want)
1 1/2 tablespoons olive oil
1 1/2 tablespoons butter
1 lemon, halved and seeded

Take each chicken breast and pound until it is ~1/2-inch thick, using a meat mallet or a rolling pin. Cut each breast in half (you will have 8 thin chicken tenders). 

Mix together the flour, salt, and pepper in a dinner plate and set aside. Whisk together the eggs and 1 tablespoon of water in a dinner plate and set aside. Finally, mix together the breadcrumbs and the parmesan together in a dinner plate and set aside. 

Heat a large skillet over medium heat and once hot, add half the olive oil and butter. Dredge each side of each chicken breast first in the flour mixture, then in the egg mixture, then in the breadcrumb mixture, lightly patting the breadcrumbs to help them adhere. Place in the hot pan and let sizzle away. Sprinkle a little more salt on top, if you think it needs it, and squeeze a bit of lemon juice onto each cutlet as it is cooking. Once lightly browned, flip and cook on the other side- these do not take long to cook. Remove chicken from pan, add more olive oil and butter as needed and keep frying the chicken. 

Serve with a light salad of mixed greens. Mmmm-mmm-mmm. 

Sunday, July 15, 2012

Blackberry Gin Fizz


I first saw this recipe earlier this month in the August 2012 issue of Bon Appetit. I drooled over the picture and recipe and then forgot about it until last week when Smitten Kitchen made and posted her version... beat me to the punch. It was good timing, though, because my folks were in town this weekend and I thought this was the perfect occasion to try a new cocktail.

And ohhh boy. Let me tell you about this cocktail. It is to die for. It goes down so easily that you can literally chug it, the way you'd take a bottle of lemonade from the fridge on a hot day and down the entire thing in 3 huge gulps. You will find yourself making another batch before you're even halfway finished with the first batch, because god-forbid you have to wait 5 minutes between tastes. Just do yourselves a favor and make this.

Serves 8.
Or 4 people twice.
Or 2 people four times.


INGREDIENTS
5-oz. ripe & juicy blackberries
4 ripe & juicy strawberries OR 10 ripe & juicy raspberries OR another yummy fruit
1/2 cup granulated sugar
1 cup freshly squeezed lime juice
2 cups gin
2 cups club soda
basil leaves

Using a food processor (or immersion blender) puree the berries and sugar until smooth. Let sit for about 10 minutes, stirring occasionally, until the sugar dissolves. Pour into a strainer set over a bowl to separate the fruit juice from the seeds; discard seeds. You should have about 3/4+ cup of berry juice.

In a large pitcher combine the berry juice, lime juice, and gin and stir well. Pour equal amounts in the bottom of each glass, add a handful of ice cubes, stir again, then top with equal amounts of club soda. Give it a quick and light stir and top with a basil leaf or two. Serve and enjoy!

Saturday, July 7, 2012

Spicy Green Tomato Soup with Shrimp


This is another recipe from chef Ben Barker at the restaurant formerly known as Magnolia Grill (RIP). Yet another awesome soup that can be served hot or cold, which is a nice option for the serious heat-wave that we're experiencing. I've adapted it ever-so-slightly. Serves 8; soup base freezes beautifully.

SOUP INGREDIENTS
4 ounces pancetta, diced
1/2 (scant) cup vegetable oil
2 medium onions, peeled and sliced thin
6 cloves garlic, minced
2 jalepenos, stemmed and sliced, with seeds
4 green poblano/pasilla chiles, stemmed, seeded and sliced
2 small cans fire-roasted diced green chiles
2 bay leaves
3 1/2 pounds firm green tomatoes, cored and cut into eighths
6 cups chicken broth
1 cup basil leaves
3 tablespoons lemon juice
a few dashes of tabasco, to taste
salt & pepper

GARNISH INGREDIENTS
2 whole red tomatoes
1 1/2 pounds shrimp, peeled and deveined
garlic powder, paprika, salt & pepper
4 ounces cooked pancetta (from above)
1 cup sour cream, thinned with 2 tablespoons milk

Heat the pancetta and oil in large soup pot over medium heat until the fat is rendered from the pancetta and its nice and crispy. Remove the pancetta, reserve for later. Add the onions to the hot oil and cook, stirring occasionally until soft, but not browned. Add the garlic, jalepenos, poblano/pasillas, diced green chiles, and bay leaves and cook for 5 minutes, stirring occasionally. Add the green tomatoes and chicken stock and bring to a boil; reduce to a simmer and cook for about 15-20 minutes, until the tomatoes soften. Remove the bay leaves, add the basil, and puree in a blender or food processor in batches. Put soup back in the large pot, add lemon juice, tabasco, and salt to taste. Keep warm if serving hot, or let cool and refrigerate if serving cold.

To make the garnish....
Bring a medium pot of water to boil and drop the whole tomatoes in for 10-30 seconds. Remove and immediately submerge in ice water to cool. After a minute or so, remove the tomatoes from the ice water and peel off the skin. Dice the tomatoes (removing the seeds and juice) and reserve for the soup topping.

Meanwhile, heat a large skillet over medium heat with a little olive oil. Season the shrimps with garlic powder, paprika, salt and pepper and cook in the skillet. Remove from heat and chop into 1/2-inch pieces. Once soup is ready to be served, place mounds of the shrimp in the center of a bowl, ladle the soup around the shrimp, and sprinkle the tops with pancetta and tomatoes. Finally, drizzle a bit of the sour cream on top... serve and enjoy!

Monday, June 4, 2012

Raspberry Swirl Cheesecakes

Martha, you're the best. This is the second Martha Stewart mini cheesecake recipe I've tried, and this was just as good, if not better, than the last. I made these with the help of a few girlfriends this weekend to bring to a potluck. We made the mistake of halving the recipe because we thought: who could ever eat 36 mini cheesecakes? Well, um, we could have. And I wish we had at least made a full recipe. One of my friends said we should have actually doubled the recipe. It is possible that 72 mini cheesecakes woulda been overkill, but I'm really not so sure. These were incredible.

INGREDIENTS
1 1/2 cups graham cracker crumbs
3 tablespoons unsalted butter, melted
1 1/2 cups plus 5 tablespoons sugar
6-ounces  fresh raspberries
2 lbs. cream cheese, room temp
pinch of salt
1 1/2 teaspoon vanilla extract
4 large eggs, room temperature

Preheat oven to 325 degrees. Line standard muffin tins with liners.

In a medium bowl stir together the graham cracker crumbs, butter, and 3 tablespoons of sugar until combined. Press about 1 tablespoon of the mixture into the bottom of each muffin liner. Bake until set, about 5 minutes. Let cool.

Using a food processor or blender, puree the raspberries until smooth. Pass through a fine mesh strainer, extracting as much juice as possible; discard the seeds. Whisk in 2 tablespoons of sugar and set aside.

Using an electric mixer set to high speed beat the cream cheese until fluffy, scraping down the sides of the bowl as needed. On low, add the sugar in a steady stream. Add salt and vanilla and mix until combined. Add eggs, one at a time, beating until just incorporated after each.

Spoon about 3 tablespoons of filling over each crust and dollop 3 1/2-teaspoon drops of raspberry puree on top of each. Using a toothpick, swirl the sauce into the filling. Place each muffin tin in a high rimmed baking sheet and pour about 1/2-inch of hot water into the bottom of the pan (not in the cheesecakes, obviously). Bake for about 24-30 minutes. Carefully remove from water bath, transfer to a wire rack and cool. Refrigerate in tins, uncovered at least 4 hours. Serve and enjoy!

Sunday, June 3, 2012

Spinach, Bacon, & Fried Goat Cheese Salad


My favorite kind of salads are the ones filled with so much bacon, cheese, and fried things that you just know your heart woulda been better off if you'd just eaten a double cheeseburger... only half kidding. This is one of those salads that has quickly become a favorite of mine. It was so delicious and satisfying, although, when are bacon and fried goat cheese ever not satisfying? Ya gotta make this. Makes 2 main course salads.


INGREDIENTS
4 ounces baby spinach
1/4 cup candied pecans
5 pieces of fried bacon- keep the bacon grease for the dressing
1 clove garlic, minced
1 teaspoon fresh thyme leaves, minced
2 tablespoons red wine vinegar
1/4 cup dried cranberries

Fried Goat Cheese
3 ounces goat cheese
1/3 cup flour
1 egg, beaten
1/2 cup panko bread crumbs
1/4 teaspoon dried thyme
1/4 teaspoon garlic powder
pinch of salt

Equally divide the spinach, pecans, and bacon pieces between two bowls or plates and set aside. Next, make the fried goat cheese. To do this, take the goat cheese and cut into 1/3-inch slices using a knife just run under hot water (you should get about 6 slices). Place slices on a plate and refrigerate for a few minutes. Meanwhile, place the flour in a small bowl, the egg in another bowl, and combine the bread crumbs, thyme, garlic powder, and salt in another. Take each slice of cheese and first coat both sides in the flour, then the egg, then the bread crumbs. Fry each in a bit of olive oil until lightly browned on each side. They are delicate, to be careful. Place 3 pieces on each salad. 

Quickly wipe out the oil from frying the cheese and pour 4 tablespoons of bacon grease into the pan. If you do not have this much, substitute olive oil. Add the bacon pieces and cook until warmed. Add the garlic and cook, stirring, for about 20-30 seconds. Add the thyme and cook for 10 seconds. Pour in the red wine vinegar and cranberries and immediately take off the heat. Give a quick stir and pour on top of salads. Eat and enjoy (this is not a salad you want sitting around for a long time... eat right away!).